


POSTMAN 이란 ?
API 개발을 보다 빠르고 쉽게 구현할 수 있도록 도와주는
테스트 결과를 공유하며 API개발의 생산성을 높여주는 플랫폼
POSTMAN이 나오게 된 이유
post의 경우 html 클라이언트에서 form, 버튼, 이벤트, 이벤트 등록, 등등등... 백엔드를 구현하기 전 우선 만들어져야 하는 것들이 있다. 그럼 백엔드가 프론트엔드가 구현되기를 기다려야하는 상황이 발생한다. => 이러한 불편함을 개선하기 위해 postman 탄생
POSTMAN 사용하면 좋은 점
-> postman은 가벼운 툴이다.
-> Rest API를 표현할 수 있다.
-> 협업할 때 팀원이 만든 url을 확인할 때 편리하다.
-> 인터페이스를 구축해 놓은 툴인 Postman 을 사용하게 되면 변수 및 환경, Request, 테스트 등 자유롭게 가능하고 테스트한 환경, 요청한 Request History 등 이 그대로 저장되어 시간과 장소에 구애받지 않고 나의 작업환경을 다시 쉽게 가져올 수 있다.
POSTMAN 다운로드 / 설치 / 회원가입
구글로 간편하게 회원가입 가능하다.
https://www.postman.com/downloads/
Download Postman | Try Postman for Free
Try Postman for free! Join 15 million developers who rely on Postman, the collaboration platform for API development. Create better APIs—faster.
www.postman.com
사용법
0. Node.js Server.js 파일 작성 / 서버 연결해놓기
* get 과 post 두 가지를 작성해 봄
const express = require('express')
const app = express()
const bodyParser = require('body-parser')
const db = require('./models') //index 생략 가능


app.use(bodyParser.urlencoded({extended:false}))
db.sequelize.sync() // sync() 결과값 : Promise 객체
.then(()=>{console.log('DB접속 성공')})
.catch((e)=>{console.log(`DB접속 실패! 에러 -> ${e} `)})

app.get('/', (req,res)=>{
    res.send('안녕 postman (get)')
})

app.post('/',(req,res)=>{
    res.send('post로 받음 ! ')
})

app.post('/comment', (req,res)=>{
   // 포스트맨으로 해보기 !
})


app.listen(3001,()=>{
    console.log('post test')
    console.log(`server start port: 3000`)
})
1. Workspaces - New Workspace 클릭

이름 정하기 / 팀원도 추가할 수 있다.
-> Create workspace 클릭

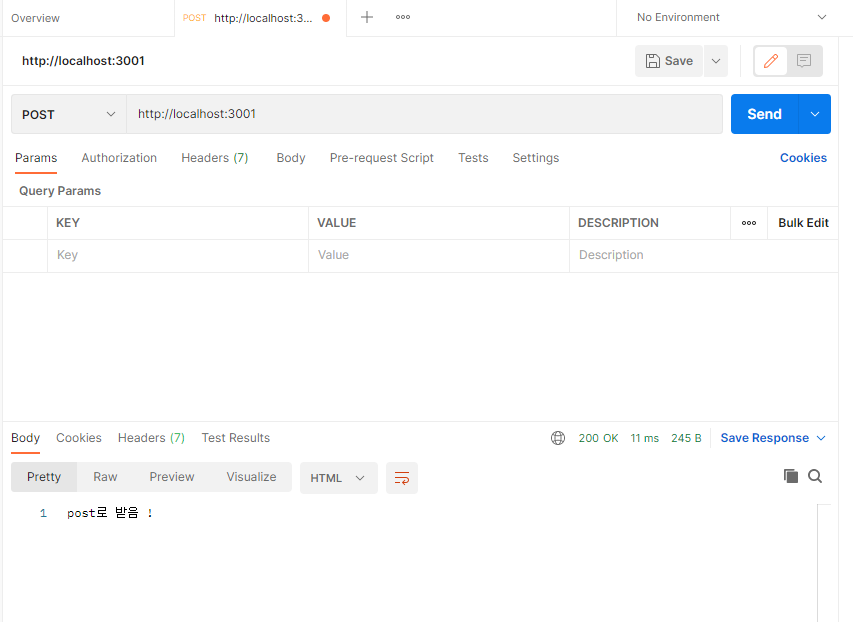
2. + 탭 눌러서
Get, Post .... Rest API 를 선택 + url 작성 -> send 클릭

Node.js server.js 에서 작성한 내용이 get, post에 따라 각각 나온다.

3. post : body 에 값 담아서 테스트 해보기
node.js 필요한 bodyParser 설치 / 코드 수정
npm i bodyParser
server.js
app.post('/',(req,res)=>{
    res.json(req.body)
})
평소 자주 쓴 Request Method - GET, POST 뿐만 아니라 아~주 다양한 방법들이 세분화 되어 있다.
request method type
1. GET - 데이터를 가져올 때 (R) select문
2. POST - 데이터를 입력할 때 (C) insert문
3. PUT - 데이터를 수정할 때 (U) update문 (전체를 수정하는거라 쓰는 경우가 드물다)
4. DELETE - 데이터를 삭제할 때 (D) delete문
5. PATCH - 데이터를 일부만 수정할 때 (U) update문 (회원정보 중 하나만 수정 시)
6. OPTIONS - 요청을 체크
7. HEAD - 데이터를 req msg header만 받아올 때 (oauth login 할 때 - 아직 쓸일이 읎다.)
모든 API를 모두 POST로 한다거나 그러면 -> Restful 하지 못한 코드가된다.
각각의 특성에 맞춰 API 사용하는 것이 Resful한 API
Rest API 란 ?
https://blckchainetc.tistory.com/199
API란? REST / REST API / RESTful 이란?
API란? [Application Programming Interface] 응용 프로그램 프로그래밍 인터페이스 - 애플리케이션과 기기가 데이터를 원활히 주고받을 수 있도록 중간 매개체 역할 - 애플리케이션들이 서로 소통할 때
blckchainetc.tistory.com
POSTMAN CRUD
C create
R read
U update
D delete
sequelize를 사용하여 Comment라는 DB 를 설정해 놓고 아래 crud 를 postman 사용해서 해보기
1. Create by POST
server.js
app.post('/', async(req,res, next)=>{
    const {userid,content} = req.body;
    console.log(userid,content)
    try{
        const data = await Comment.create({
            userid,content
        })
        res.json(data)
    }catch(e){
        console.error(e)
        next(e)
    }
})
postman

mysql DB

2. Read by GET
server.js
app.get('/', async (req,res, next)=>{
    console.log(Comment)
    try{
        const data = await Comment.findAll({})
        res.json(data)
    }catch(e){
        console.error(e)
        next(e)
    }
})
postman

mysql db에 들어가 있는 것을 FindAll로 모두 가져와서 보여준다 ! (READ)
3. Update by PATCH
server.js
app.patch('/:id', async(req,res, next)=>{
    const {id} = req.params;
    const {content} = req.body;
    try{
        const data = await Comment.update({
            content
        },{
            where:{id}
        })
        // 수정된 곳이 있으면 ? A 없다면  : B

        console.log(data)   // [ 1 ]
        console.log(data[0])   // 1
        const result = data[0] >= 1
        ? {result:'SUCCESS', msg:'댓글이 수정되었습니다.', count:data[0]}
        : {result:'ERROR', msg:'서버 오류가 발생되었습니다.', count:data[0]}

        res.json(result)
    }catch(e){
        console.error(e)
        next(e)
    }
})
** data를 console.log 찍어보면 배열 안에 [ 1 ] 수정된 값(수)이 나오는 것 같다
그래서 data[0] > =1 으로 삼항연산자 쓰기 !
오늘 새로 배운 점 : '/:id' ** 요걸 쓰게되면 요청하는 url 마지막에 / + id 값을 넣어 특정 id 를 선택할 수 있다.
http://localhost:3001/1 // mariaDB에서 id = 1인 곳
postman

userid : ASDF 의 content를 HIHI에서 HELLOOOOO로 변경했다.

4. Delete by DELETE
server.js
app.delete('/:id', async (req,res, next)=>{
    const {id} = req.params;
    try{
        const data = await Comment.destroy({
            where:{id}
        })
        const result = data>=1
        ? {result:'SUCCESS', msg:'댓글이 삭제되었습니다.', }
        : {result:'ERROR', msg:'서버 오류가 발생되었습니다.'}
        res.json(result)
    }catch(e){
        console.error(e)
        next(e)
    }
})
* console.log(data) 를 해보면 1개가 삭제되면 1이라고 나온다. - update 수정의 경우 배열에 담겼었다 (delete은 그냥 number !)
삭제된 것이 있으면 -> data>=1 ? 로 표현할 수 있다.
postman

mysql

Get, Post, Patch, Del 을 아래처럼 save 하는 기능도 있다


전체 코드
const express = require('express')
const app = express()
const bodyParser = require('body-parser')
const db = require('./models') //index 생략 가능
const {Comment} = require('./models')

app.use(bodyParser.urlencoded({extended:false}))
db.sequelize.sync() // sync() 결과값 : Promise 객체
.then(()=>{console.log('DB접속 성공')})
.catch((e)=>{console.log(`DB접속 실패! 에러 -> ${e} `)})


app.get('/', async (req,res, next)=>{
    console.log(Comment)
    try{
        const data = await Comment.findAll({})
        res.json(data)
    }catch(e){
        console.error(e)
        next(e)
    }
})


app.post('/', async(req,res, next)=>{
    const {userid,content} = req.body;
    console.log(userid,content)
    try{
        const data = await Comment.create({
            userid,content
        })
        res.json(data)
    }catch(e){
        console.error(e)
        next(e)
    }
})

app.patch('/:id', async(req,res, next)=>{
    const {id} = req.params;
    const {content} = req.body;
    try{
        const data = await Comment.update({
            content
        },{
            where:{id}
        })
        // 수정된 곳이 있으면 ? A 없다면  : B

        console.log(data)   // [ 1 ]
        console.log(data[0])   // 1
        const result = data[0] >= 1
        ? {result:'SUCCESS', msg:'댓글이 수정되었습니다.', count:data[0]}
        : {result:'ERROR', msg:'서버 오류가 발생되었습니다.', count:data[0]}

        res.json(result)
    }catch(e){
        console.error(e)
        next(e)
    }
})


app.delete('/:id', async (req,res, next)=>{
    const {id} = req.params;
    try{
        const data = await Comment.destroy({
            where:{id}
        })
        console.log(data)
        const result = data>=1
        ? {result:'SUCCESS', msg:'댓글이 삭제되었습니다.', }
        : {result:'ERROR', msg:'서버 오류가 발생되었습니다.'}
        res.json(result)
    }catch(e){
        console.error(e)
        next(e)
    }
})


app.listen(3001,()=>{
    console.log('post test')
    console.log(`server start port: 3001`)
})


