


useReducer
useState처럼 상태를 관리할 때 쓰는 hook, useState와 다르게 상태 업데이트 로직을 컴포넌트 밖에 작성 할 수도 있고 다른 파일에 작성 후 불러 올 수도 있다. 때문에 컴포넌트의 상태를 따로 잘 관리할 수 있는 용이함이 있다 !
1. +1 -1 버튼 누르면 가감되는 기본 코드 작성 (useReducer 사용 없이)
import React from 'react'

const Counter =()=>{
    const [number, setNumber] = React.useState(0)

    const onUp =()=>{
        setNumber(preNumber=>preNumber+1)
    }
    const onDown =()=>{
        setNumber(preNumber=>preNumber-1)
    }

    return(
        <>
            <h2>{number}</h2>
            <button onClick={onUp}>+1</button>
            <button onClick={onDown}>-1</button>
        </>
    )
}

export default Counter
2. 위의 코드를 useReducer로 바꿔보기
import React from 'react'

reducer =(number, action)=>{
    switch(action.type){
        case 'UP':
            return number + 1
        case 'DOWN':
            return number -1
        default:
            return number;
    }
}

const Counter =()=>{
    // const [number, setNumber] = React.useState(0)
    const [number, dispatch] = React.useReducer(reducer,0)

    const onUp =()=>{
        dispatch({type:'UP'})
    }
    const onDown =()=>{
        dispatch({type:'DOWN'})
    }

    return(
        <>
            <h2>{number}</h2>
            <button onClick={onUp}>+1</button>
            <button onClick={onDown}>-1</button>
        </>
    )
}

export default Counter
useReducer의 기본 구문
const [number, dispatch] = React.useReducer(reducer,0)useState와 비슷하게 왼쪽에는 변수들을 오른쪽에는 매서드를 쓰고 useReducer의 인자값은
첫 번째 인자값 : dispatch가 불리면 실행시킬 함수
두 번째 인자값: 변수 number의 초기값
흐름 : button click -> onUp 함수 실행 -> dispatch 에 실행 (인자값 객체 {type:'UP'} ) -> type이 'UP'일 때 명령 찾아서 실행 (number 상태값 변경)
3. Component 밖으로 빼두었던 함수를 아예 다른 파일로 옮겨보기
components>counter>reduce.js - ' export const ' 추가
export const reducer =(number, action)=>{
    switch(action.type){
        case 'UP':
            return number + 1
        case 'DOWN':
            return number -1
        default:
            return number;
    }
}
Counter.jsx - reduce.js 파일 불러오기 - 변수를 빼올 때는 { } 요렇게 가져오는 것 같다.
import React from 'react'
import {reducer} from './counter/reducer'
4. 'UP', 'DOWN' string을 변수로 만들어보기
reduce.js
export const UP = 'UP'
export const DOWN = 'DOWN'

export const reducer =(number, action)=>{
    switch(action.type){
        case 'UP':
            return number + 1
        case 'DOWN':
            return number -1
        default:
            return number;
    }
}
Counter.jsx
import React from 'react'
import {reducer, UP, DOWN} from './counter/reducer'

const Counter =()=>{

    const [number, dispatch] = React.useReducer(reducer,0)

    const onUp =()=>{
        dispatch({type:UP})
    }
    const onDown =()=>{
        dispatch({type:DOWN})
    }
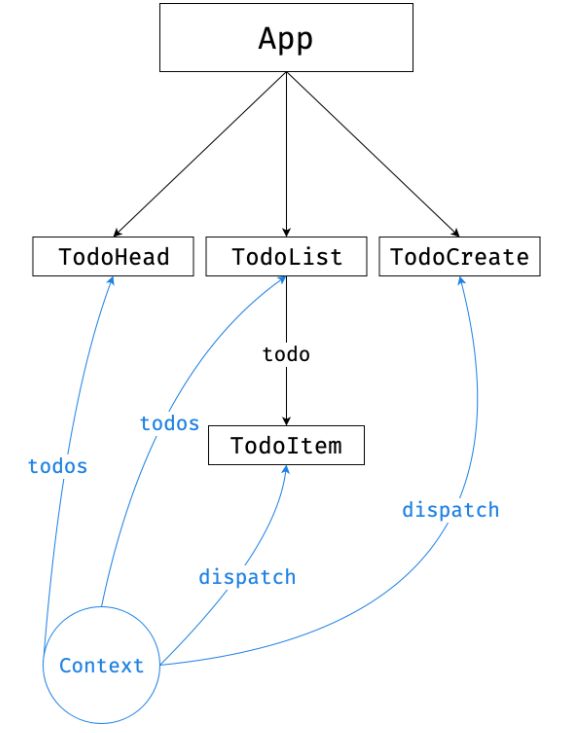
Context
복잡하게 연결도니 컴포넌트들 사이에 값을 주고 받는게 너무 깊어지면 코드가 복잡해지고 비효율적이다. Context는 특정 데이터들을 저장해두어 컴포넌트들이 해당 값을 원할 때 바로 넘겨주는 저장소 역할이다. 예를 들면 현재 로그인된 사용자의 정보, 설정 등은 여러 컴포넌트 안에서 필요로 하기 때문에 이런 경우에 유용하다!
1. components > context폴더 - Layout > LoginBtn > Login > Button (Button출력) 순으로 jsx 파일 생성 및 코드 작성
Layout.jsx
import React from 'react'

const Layout = () =>{
    return(
        <>
            <LoginBox/>
        </>
    )
}

const LoginBox = () =>{
    return(
        <>
            <Login/>
        </>
    )
}

const Login = () =>{
    return(
        <>
            <Button />
        </>
    )
}

const Button = () =>{
    return(
        <>
            <button>버튼이다</button>
        </>
    )
}

export default Layout
App.jsx
import React,{Component} from 'react';
import Memo from './memo/memo'
import Counter from './components/Counter'
import Layout from './components/context/Layout'

const App=()=>{

    return(
        <>
            {/* <Memo/> */}
            {/* <Counter /> */}
            <Layout/>
        </>
    )

}

export default App
2. componets 폴더 > context > LayoutContext.js 파일 생성 -> 요걸로 Layout Component를 감싸서 context로 쓸 예정 LayoutContext.jsx
import React from 'react'

export const LayoutContext = React.createContext() // context 생성 (하나의 컴포넌트이다!)

const LayoutStore =(props) =>{

    const user={
        userid:'asdf',
        username:'eeee',
        job:'www'
    }

    return(
        <LayoutContext.Provider value={user}>
            {props.children}
        </LayoutContext.Provider>
    )
}

export default LayoutStore
4개 컴포넌트를 담기 위한 LayoutContext,
createContext() -> 요게 context를 만들고 다른 컴포넌트들에게 값을 달라는 요청을 받는 아이
LayoutStore는 children 쓰려고 만든 껍데기
LayoutContext.Provide value <- 실질적으로 데이터를 넣는 공간
Layout.jsx
import React from 'react'
import LayoutStore, { LayoutContext } from './LayoutContext'

const Layout = () => {
    return (
        <>
            <LayoutStore>
                <LoginBox />
            </LayoutStore>
        </>
    )
}

const LoginBox = () => {
    return (
        <>
            <Login />
        </>
    )
}

const Login = () => {
    return (
        <>
            <Button />
        </>
    )
}

const Button = () => {

    const context = React.useContext(LayoutContext)

    return (
        <>
            <button>버튼이다</button>
            <ul>
                <li>{context.userid}</li>
                <li>{context.username}</li>
                <li>{context.job}</li>
            </ul>
        </>
    )
}

export default Layout
Styled Component
React에서 CSS 하는 방법 !
1) 먼저 Styled-Component 사용하지 않고 일반 변수로 css 내용을 넣어서 하는 방법
1. components 폴더 안 styleComponent 파일 > index.jsx 생성 / 코드 작성
index.jsx
import React from 'react'

const Index =()=>{
    return(
        <>
            hi styled-Component
            <div>
                <input type="text"/>
                <button >
                    button이다ㅏㅇ
                </button>
            </div>
        </>
    )
}
export default Index
App.jsx 가져오기
import React,{Component} from 'react';
import Memo from './memo/memo'
import Counter from './components/Counter'
import Layout from './components/context/Layout'
import Index from './components/StyleComponent/index'

const App=()=>{

    return(
        <>
            {/* <Memo/> */}
            {/* <Counter /> */}
            {/* <Layout/> */}
            <Index/>
        </>
    )

}

export default App
2. index.jsx button 에 직접 style 넣기 (아직 styled-component 사용 x)
ButtonStyle이라는 변수에 css를 넣고 (여기서 , 콤마 사용 ! ) 해당 변수를 요소의 style={} 안에 넣으면 끝 !
index.jsx
import React from 'react'

const ButtonStyle ={
    "background":'black',
    'border':'none',
    'color':'white',
    'padding':'7px 14px',
}

const Index =()=>{
    return(
        <>
            hi styled-Component
            <div>
                <input type="text"/>
                <button style={ButtonStyle}>
                    button이다ㅏㅇ
                </button>
            </div>
        </>
    )
}

export default Index
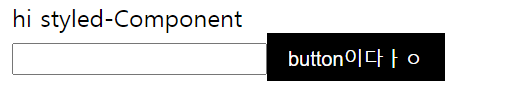
일반 css 변수로 만들면 -> html css에 다 들어가있다.
검정 버튼은 element.style 안에 css가 들어가 있음
2) Styled-Component 로 css 하는 방법
1. npm 설치
$ npm i styled-components
2. styled-components 가져오기
import React from 'react'
import Styled from 'styled-components'
3. 변수에 styled.buttond -> styled + 요소 (?) => 야는 Component!!
Components 사용처럼 그대로 사용하기 !
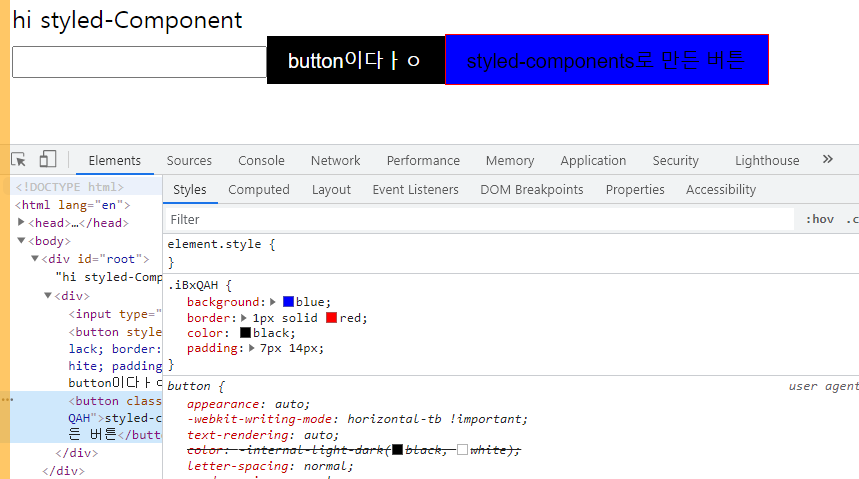
const StyledBtn = styled.button`
background:blue;
border:1px solid red;
color:black;
padding:7px 14px;
`
const Index =()=>{
return(
<>
hi styled-Component
<div>
<input type="text" />
<button style={ButtonStyle} >
button이다ㅏㅇ
</button>
<StyledBtn>
styled-components로 만든 버튼
</StyledBtn>
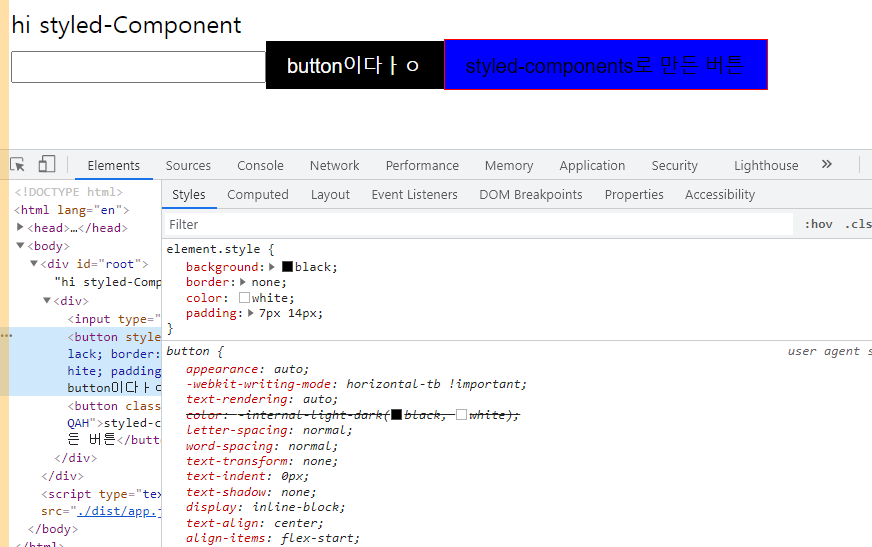
</div>

application 을 보면 파란색 (styled-components사용한) 버튼은 element.sytle 에 css가없고 .iBxQAH (?) 로 따로 빠져있음 ! 협업할 떄 이렇게 css가 분리되어 있으면 변수가 겹치지않아 좋다고 한다.
4. hover 해보기
const StyledBtn = styled.button`
    background:blue;
    border:1px solid red;
    color:black;
    padding:7px 14px;
`

const BtnHover = styled(StyledBtn)`
    :hover{
        background:green;
    }
`

const Index =()=>{
    return(
        <>
            hi styled-Component
            <div>
                <input type="text" />
                <button style={ButtonStyle} >
                    button이다ㅏㅇ
                </button>
                <StyledBtn>
                    styled-components로 만든 버튼
                </StyledBtn>
                <BtnHover>
                    hover
                </BtnHover>
            </div>
        </>
    )
}
BtnHover 라는 변수에 styled(StyledBtn) StyledBtn css컴포넌트를 넣으니 그대로 css 똑같아졌다 ! 그리고 :hover 로 배경색 바꾸기
5. DOM, 문서 객체 모델 조작해보기
위의 검정 버튼을 클릭하면 input box 에 cursor() 가도록 만들기
index.jsx
const Index =()=>{


    const inputRef = React.useRef()

    const handleClick=()=>{
        console.log(inputRef)
        console.log(inputRef.current)
    }

    return(
        <>
            hi styled-Component
            <div>
                <input type="text" ref={inputRef}/>
                <button style={ButtonStyle} onClick={handleClick}>
                    button이다ㅏㅇ
                </button>
                <StyledBtn>
                    styled-components로 만든 버튼
                </StyledBtn>
                <BtnHover>
                    hover
                </BtnHover>
            </div>
        </>
    )
}

export default Index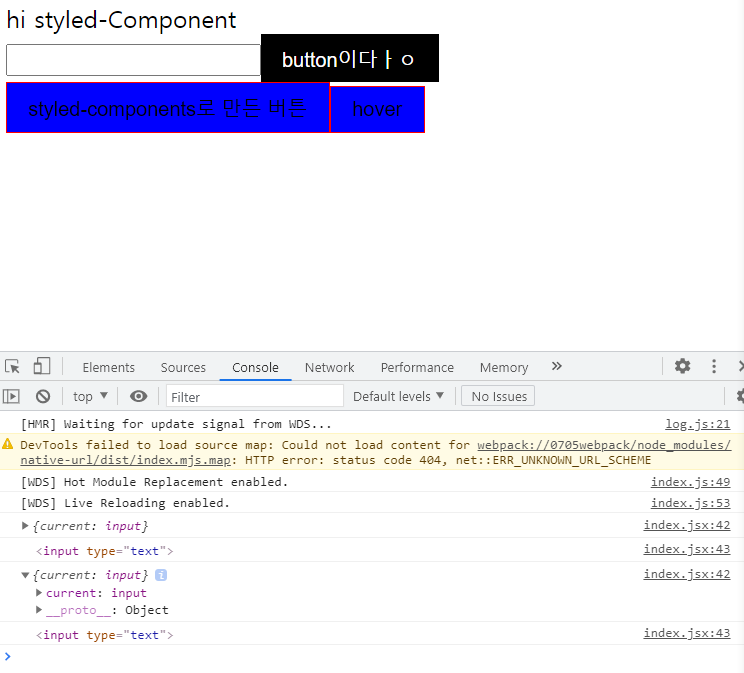
React.useRef() 라는 매서드를 inputRef 변수에 담고 이 변수를 어떤 요소에 속성으로 넣으면 그 요소자체를 가져오는 , 참조할 수 있는 (?) 그런게 되는 거 같다.
위의 내용을 활욯해서 onClick 함수가 실행되면 input box 를 크게 만들기
    const handleClick=()=>{
        console.log(inputRef)
        console.log(inputRef.current)
        let input_Ref = inputRef.current.style;
        input_Ref.height = '30px'
        // if()
    }
-
    const handleClick=()=>{
        console.log(inputRef)
        console.log(inputRef.current)
        let input_Ref = inputRef.current.style;
        input_Ref.height = '30px'
        if(input_Ref.display=='block'){
            input_Ref.display='none'
        }else{
            input_Ref.display ='block'
        }
    }
onClick하면 첫 번째 클릭에는 height=30px되고 또 두 번째 클릭을 해야 if절의 input_Ref.display='none' 이 실행된다. if 절 안에 넣어도 똑같다. 왜그럴까,,,,,,,,,,
오늘 배운 내용으로 TicTacToe 만들어 보기
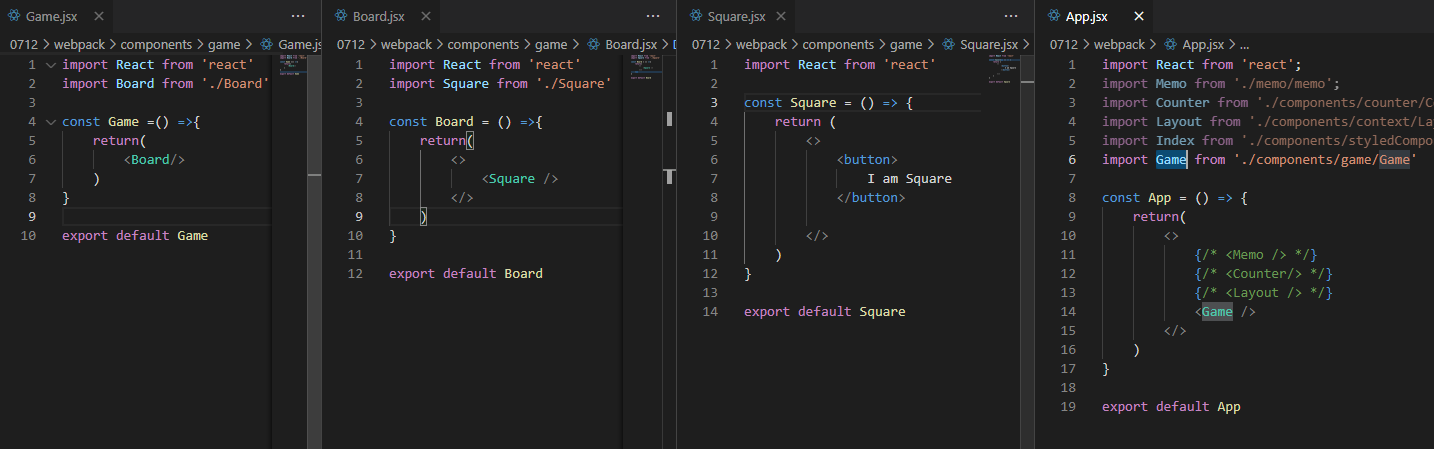
1. component>game 폴더에 > Game, Board, Square Components 생성 / 코드 작성
2. 화면 구성부터 만들기
Game.jsx
styled-components 설치 및 가져오기 + Board 컴포넌트를 담을 GameDiv 라는 styled component 만들어서 감싸기
import React from 'react'
import Board from './Board'
import Styled from 'styled-components'

const GameDiv = Styled.div`
    display:flex;
    flex-wrap:wrap;
    align-item:center;
    justify-content:center;
    width:300px;
    background:darkcyan;
`

const Game = () => {

    return (
        <GameDiv>
            <Board />
        </GameDiv>
    )
}

export default Game
Board.jsx Square 9번 반복
import React from 'react'
import Square from './Square'

const Board = () => {

    return (
        <>
            <Square />
            <Square />
            <Square />
            <Square />
            <Square />
            <Square />
            <Square />
            <Square />
            <Square />
        </>
    )
}

export default Board
Square.jsx
import React from 'react'
import Styled from 'styled-components'
import { LayoutContext } from '../context/LayoutContext'

const Btn = Styled.button`
    width:33.3%;
    height:90px;
    border:1px solid darkcyan;
    background:white;
    cursor:pointer;
    font-size:30px;
`

const Square = () => {

    return (
        <>
            <Btn>
                0
            </Btn>
        </>
    )
}

export default Square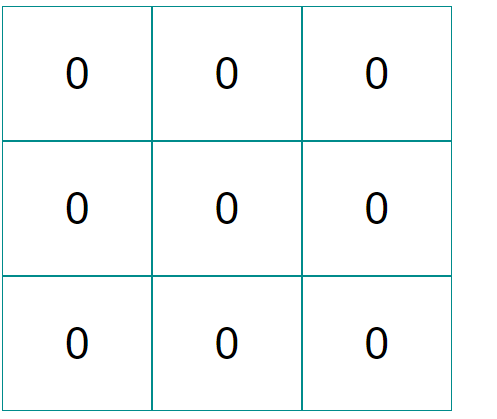
3. 로직 구현하기
1) Game에 useReducer 사용해서 state 변수에 suqares, xIsNext, winner 3 가지 넣기
2) 위의 내용 활용해서 빙고판 위에 다음에 X or O 인지 또는 승자가 나오면 승자를 출력하도록 만들기
Game.jsx
import React from 'react'
import Board from './Board'
import Styled from 'styled-components'

const GameDiv = Styled.div`
    display:flex;
    flex-wrap:wrap;
    align-item:center;
    justify-content:center;
    width:300px;
    background:darkcyan;
`

const defaultState = {
    squares: Array(9).fill(null),
    xIsNext: false,
    winner: null,
}

const reducer = (state, action) => {
    switch(action.type){
        case 'NEXT':
            const {squares} = {...state}
            squares[action.index] = state.xIsNext ? 'X' : 'O'
            return{
                ...state,
                xIsNext:!state.xIsNext,
                squares,
            }
        case 'WIN':
            return{
                ...state,
                winner:action.winner
            }
    }
}

const Winner =(squares)=>{
    let lines = [
        [0,1,2],
        [3,4,5],
        [6,7,8],
        [0,3,6],
        [1,4,7],
        [2,5,8],
        [0,4,8],
        [2,4,6]
    ]

    for (let i = 0; i<lines.length; i++){
        let [a,b,c] = lines[i]
        if(squares[a] && squares[a]==squares[b] && squares[a] == squares[c]){
            return squares[a]
        }
    }
    return null
}

const Game = () => {

    const [state, dispatch] = React.useReducer(reducer, defaultState)

    const handleClick=(n)=>{
        if(state.squares[n]) return;
        if(state.winner) return;
        dispatch({type:'NEXT', index:n})
        console.log(n)
    }

    React.useEffect(()=>{

        const WIN = Winner(state.squares)
        if(WIN!==null){
            console.log(WIN)
            dispatch({type:'WIN', winner:WIN})
        }
        console.log(state.winner)
    },[state.xIsNext])

    return (
        <>
            {state.winner ? `${state.winner}님 승리!` : `Next Player : ${state.xIsNext ? 'X' : 'O'}`}
            <GameDiv>
                <Board
                    squares={state.squares}
                    onClick={handleClick}
                />
            </GameDiv>
        </>
    )
}

export default Game
Board.jsx
import React from 'react'
import Square from './Square'

const Board = ({squares, onClick}) => {
    const square = squares.map((v,k)=>{
        return (
            <>
                <Square
                    key={k}
                    value={v}
                    onClick={()=>onClick(k)}
                />
            </>
        )
    })
    return(
        <>
            {square}
        </>
    )

}

export default Board
Square.jsx
import React from 'react'
import Styled from 'styled-components'
import { LayoutContext } from '../context/LayoutContext'

const Btn = Styled.button`
    width:33.3%;
    height:90px;
    border:1px solid darkcyan;
    background:white;
    cursor:pointer;
    font-size:30px;
`

const Square = ({value,onClick}) => {

    return (
        <>
            <Btn onClick={()=>onClick()}>
                {value}
            </Btn>
        </>
    )
}

export default Square
References:
https://react.vlpt.us/mashup-todolist/02-manage-state.html
2. Context API를 활용한 상태 관리 · GitBook
02. Context API 를 활용한 상태 관리 우리가 만든 투두 리스트 애플리케이션에서, 만약 상태 관리를 한다면 다음과 같은 구조로 구현 할 수 있습니다. App 에서 todos 상태와, onToggle, onRemove, onCreate 함
react.vlpt.us
'블록체인 기반 핀테크 및 응용 SW개발자 양성과정 일기' 카테고리의 다른 글
| [87일차 복습] 리액트 Context 사용해서 댓글 추가하기 (0) | 2021.07.14 |
|---|---|
| [87일차]20210714 Context로 댓글 만들기 (with 리액트식으로 컴포넌트 구성하기) (0) | 2021.07.14 |
| [86일차]20210713 리액트 useReducer Context styled-component Ref Css TicTacToe 만들기 (0) | 2021.07.13 |
| [85일차 복습] React Hooks useMemo useCallback (0) | 2021.07.13 |
| [85일차]20210712 React hooks API useMemo useCallback (0) | 2021.07.12 |


