

줌 수업 장점 : 9시에 일어나도 된다 너무 좋다
단점 : 졸림..
어제 html, js를 다 못외움. 오늘 남은거 외우기 **
----------------------------------------------------------1교시---------------------------------------------------------
숙제 검사
찾는거는 학원에서 한 것밖에 못했다 오늘 다시 하자!
??? 나오면 한글의 인코딩의 문제이구나 ~ 라고 인지하기
가변적이면 varchar
고정적이면char (ex. 남자, 여자 이렇게 정해져있으면)
-----------------------------------------------------------2교시--------------------------------------------------------
Limit
% (like 문 사용 시)

select * from board where subjec like '%제목'
제목~으로 시작하는 애들을 가져와! (반대인듯)
board : tablename

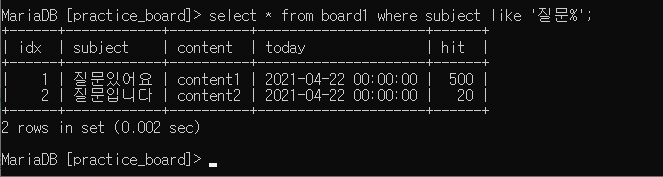
select * from board where subjec like '제목%'
제목~~으로 시작하는거 가져와쥬~
Data type
1. varchar -> 가변 길이
ex) 게시판 제목
딱 쓴만큼만 메모리를 사용할 수 있게끔 함 (효율적)
2. chat -> 고정 길이
무조건 2자리다! 5자리다! 이렇게 정해진것만
ex) 남자, 여자
3. text (dbms 마다 다르긴 함) -> n bytes 를 사용할 수 있다.
65536bytes
ex) 게시판 내용
* 날짜라면 날짜로 써야함.
4.int 숫자형
TINTINT 255정도 숫자만(check!)
INT 2,147,483,647 (21억까지)
BIGINT The BigInt data type in SQL Server is the 64-bit representation of an integer. It takes up 8 bytes of storage. It can range from -2^63 (-9,223,372,036,854,775,808) to 2^63 (9,223,372,036,854,775,807)


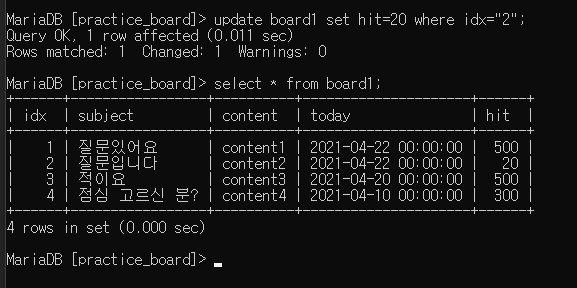
hit: 조회수
idx 해당 게시물 몇번째idx 인지 unique 한 값 필요
그래서 필요한게 primary key, autoincrement
auto increment
primary key
alter table
------------------------------------------------실습--------------------------------------------------

mariaDB열기


select * from board1 where subject like '질문%'; 처음 써봤당


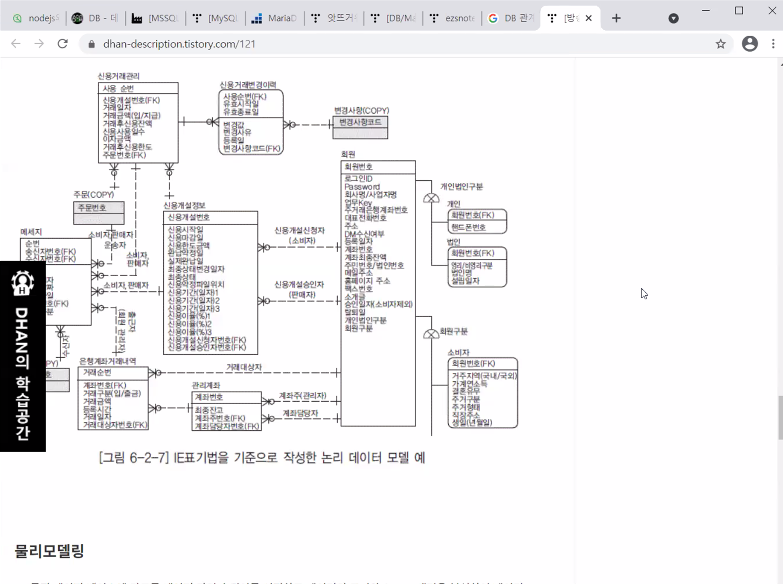
이 그림을 보고 다 이해하면 아 ~ 나 DB 안다. 라고 말할 수 있다고 함.
현재 이해도 : 0%
------------------------------------------------------여태 배운 node.js연습---------------------------------------------------
아예 새로운 폴더, 파일 만들어서 ㄱ ㄱ !
1. express만 사용해서 3000 / hello world 치기
npm시작, express설치, js 작성
| no. | 할 거 | meaning | Changes or things to check |
| 1 | npm init | npm initiate | package.json 파일 생김 |
| 2 | npm install express | express 를 설치해라 | changes : node_modules 폴더 1개 & package-lock.json 파일 1개 생성 check ! : 1. package.json 안에 express가 추가 되었는지 2. node_modules 폴더 안 express파일 생겼는지 |
JS
const express = require('express');
const app=express();

app.get('/',(req,res)=>{                 // 이 부분을 틀림 왠만하면 인자값이 다 두개래
    res.send('hello world');
});

app.listen(3000,()=>{
    console.log('server start port : 3000');
});
app.get('/hello', (req,res)=>{res.send('good day');}); 를 추가하면 localhost:3000/hello 를 치면 good day 출력됨
2. html 과 연결
html 생성, js 수정, nunjucks 다운
nunjucks 사용 이유
서버 -> html 로 보내는 방법은? tamplate engine(nunjucks 같은) 걸 사용해야해
변수 하나를 html에 넘기기 위해
서버에서 data를 html에게 변수를 넘기기 위해
1. html 보여주기위해
2. 변수를 넘기기 위해 (render의 두번째 인자값에 객체를 넣어서)
| 3 | npm install nunjucks chokidar | nunjucks & chokidar 설치 ( != sendfile 처럼 단순하지않게 - 이건 값을 넘겨주진 못해 ) |
package.json & node_modeules 췤 |
JS
const express = require('express');
const nunjucks = require('nunjucks');  //nunjucks 관련 js 추가요 ~ 1
const app=express();

nunjucks.configure('views',{    //nunjucks 관련 js 추가요 ~ 2
    express:app,
});

app.set('view engine', 'html');   //nunjucks 관련 js 추가요 ~ 3

app.get('/',(req,res)=>{
    res.render('index.html');
});

app.listen(3000,()=>{
    console.log('server start port : 3000');
});
* 어제까지 썼던 autoescape:true, 요거는 default 값이 true; 라 안써도 된다고 함.
* render로 바꾼 이유 html 을 보내기 위해
html
<!DOCTYPE html>
<html lang="en">
<head>
    <meta charset="UTF-8">
    <meta http-equiv="X-UA-Compatible" content="IE=edge">
    <meta name="viewport" content="width=device-width, initial-scale=1.0">
    <title>Document</title>
</head>
<body>
    Hello. I am HTML (allowed by nunjucks)
</body>
</html>
오늘 깨달은 점
html의 {{AAA}}} 내용이
JS 의 app.get('/', (req,res)=> { res.render('index'), {AAA:'안녕}); 과 연동되는구나
JS
const express = require('express');
const nunjucks = require('nunjucks');
const app=express();

nunjucks.configure('views',{
    express:app,
});

app.set('view engine', 'html');

app.get('/',(req,res)=>{
    res.render('index.html',{
        anything:'안뇽',
    });

});

app.listen(3000,()=>{
    console.log('server start port : 3000');
});
app.get('/' 요 rul 을 받으면 인자값(req,res)가 있는데
res.render 응답을 줄거다. (인자값이 또 2개 '파일', '객ㅊㅔ'가 있다. ) 'index.html' 파일의
{ anthing:'안뇽' } anything 에 값 '안뇽' 을 넣어라
HTML
<!DOCTYPE html>
<html lang="en">
<head>
    <meta charset="UTF-8">
    <meta http-equiv="X-UA-Compatible" content="IE=edge">
    <meta name="viewport" content="width=device-width, initial-scale=1.0">
    <title>Document</title>
</head>
<body>
    Hello. I am HTML (allowed by nunjucks)
    {{anything}}

</body>
</html>
저 anything:'안뇽'부분이 어제 이해 안갔는데 오늘 이해갔다~~~~~~~~~~~~~~~~~~~~~~~~~~~~~굳
==================================점심시간 끗================================
id userid user_id 다르게 쓴 이유가 변수가 왔다갔따하는 것을 공부시키기 위해
-> 처음에 했던 그 js,html 다시 분석하면서 공북 ㄱ ㄱ
GET 에 대해 연습
const express = require('express');
const nunjucks = require('nunjucks');
const app = express();

nunjucks.configure('views', {
    express:app,
})

app.set('view engine', 'html');

app.get('/',(req,res)=> {
    res.render('index',{
        yourname:'너의 이름',
        yourid:'너의 아이디',
        yourpw:'너의 비밀번호',
    });
})

app.listen(3000,()=>{
    console.log('server start port : 3000')
})
html form 추가
<!DOCTYPE html>
<html lang="en">
<head>
    <meta charset="UTF-8">
    <meta http-equiv="X-UA-Compatible" content="IE=edge">
    <meta name="viewport" content="width=device-width, initial-scale=1.0">
    <title>Document</title>
</head>
<body>
    HELLO ~? <br/>
    {{yourname}}<br/>
    {{yourid}}<br/>
    {{yourpw}}<br/>

    <form method="get" action="/join">
        <input type="text" name="name">
        <input type="submit" value="submit해">
    </form>
</body>
</html>
localhost:3000/ -> client
localhost:3000/join -> 이렇게 바뀜.
-> cannot do sth 이라고 브라우저에 나옴 (왜냐면 아직 안썼기때문)

localhost:3000/join?name=asdf
post 로 할 땐 body에 내용 담김 -> req.body.name
get url - >req.query.name
JS
const express = require('express');
const nunjucks = require('nunjucks');
const app = express();

nunjucks.configure('views', {
    express:app,
})

app.set('view engine', 'html');

app.get('/',(req,res)=> {
    res.render('index',{
        yourname:'너의 이름',
        yourid:'너의 아이디',
        yourpw:'너의 비밀번호',
    });
})

app.get('/join',(req,res)=>{
    res.render('join.html',{
        name:req.query.name,
    })
})

app.listen(3000,()=>{
    console.log('server start port : 3000')
})
HTML - join.html 새로 만듬
<!DOCTYPE html>
<html lang="en">
<head>
    <meta charset="UTF-8">
    <meta http-equiv="X-UA-Compatible" content="IE=edge">
    <meta name="viewport" content="width=device-width, initial-scale=1.0">
    <title>Document</title>
</head>
<body>
    {{name}}
</body>
</html>
=연습=
server.js
const express=require('express');
const nunjucks = require('nunjucks');
const app = express();

nunjucks.configure('views',{
    express:app,
})

app.set('view engine', 'html');

app.get('/', (req,res)=>{  //localhost:3000 을쳤을 때 불러와지는html
    res.render('index',{
        name:'emily',
        id:'덤블도어',
        pw:'1234',
    })
})

app.get('/join', (req,res)=>{ //submit버튼 눌렀을 때 불러와지는 html
    res.render('join',{
        anything:req.query.textbox_content,
    })
})

app.listen(3000,()=>{
    console.log('server start port:3000')
})
join.html
<!DOCTYPE html>
<html lang="en">
<head>
    <meta charset="UTF-8">
    <meta http-equiv="X-UA-Compatible" content="IE=edge">
    <meta name="viewport" content="width=device-width, initial-scale=1.0">
    <title>Document</title>
</head>
<body>
    say {{anything}}
</body>
</html>
index.html
<!DOCTYPE html>
<html lang="en">
<head>
    <meta charset="UTF-8">
    <meta http-equiv="X-UA-Compatible" content="IE=edge">
    <meta name="viewport" content="width=device-width, initial-scale=1.0">
    <title>Document</title>
</head>
<body>
    내 이름은 {{name}}이야. <br/>
    내 아이디는 {{id}}야 <br/>
    내 비밀번호는 {{pw}}야

    <form method="get" action="/join">        //submit버튼이 눌려야 form action이 실행
    <input type="text" name="textbox_content">          //   /join 으로 url 변형
    <input type="submit" value="버튼">
    </form>
</body>
</html>
name="textbox_content" 라는 이름의 text 형식의 입력창 안에 글자를 쓴 것이
req.query.textbox_content 와 같음.
GET vs POST
get은 url에 값이 나와
post는 url에 값이 안나와
근데 post처럼 값안나와도 network 맨 아래에 나옴.
3. app.post 쓰려면
| 4 | npm install body-parser | post위해 req.body 내용을 추출하기 위해 body-parser설치 | package.json & node_modeules 췤 |
index
form method="post" 변경
js
app.post 추가
app.post('/join',(req,res)=>{
res.render('join.html',{
anything_content:req.body.textbox_content,
})
})
하지만 이것만 써서는 express가 post를 못함 body-parser관련 js 추가
JS
const express=require('express');
const nunjucks = require('nunjucks');
const bodyParser = require('body-parser')   //body parser 추가 1
const app = express();

nunjucks.configure('views',{
    express:app,
})

app.set('view engine', 'html');
app.use(bodyParser.urlencoded({extended:false})); //객체 들어감. 추가 2


app.get('/', (req,res)=>{
    res.render('index',{
        name:'emily',
        id:'덤블도어',
        pw:'1234',
    })
})

app.get('/join', (req,res)=>{
    res.render('join',{
        anything:req.query.textbox_content,
    })
})

app.post('/join',(req,res)=>{                      //post 추가 3
    res.render('join.html',{
        anything:req.body.textbox_content,
    })
})

app.listen(3000,()=>{
    console.log('server start port:3000')
})
HTML index
<!DOCTYPE html>
<html lang="en">
<head>
    <meta charset="UTF-8">
    <meta http-equiv="X-UA-Compatible" content="IE=edge">
    <meta name="viewport" content="width=device-width, initial-scale=1.0">
    <title>Document</title>
</head>
<body>
    내 이름은 {{name}}이야. <br/>
    내 아이디는 {{id}}야 <br/>
    내 비밀번호는 {{pw}}야

    <form method="post" action="/join">
    <input type="text" name="textbox_content">  //textbox_content = 사용자가 입력한 내용
    <input type="submit" value="버튼">
    </form>
</body>
</html>
HTML join
<!DOCTYPE html>
<html lang="en">
<head>
    <meta charset="UTF-8">
    <meta http-equiv="X-UA-Compatible" content="IE=edge">
    <meta name="viewport" content="width=device-width, initial-scale=1.0">
    <title>Document</title>
</head>
<body>
    say {{anything}}
</body>
</html>
4. MariaDB 연결
Mariadb 다운 및 설치 설치 방법, 다운 주소 아래 ↓↓↓↓
MariaDB = MySQL (오라클이 인수)
MariaDB prompt로 db,tables,records 등 만들기 명령어 정리
[28일차 복습] mariaDB 다운로드 및 설치 / Mariadb 명령어 정리 / nunjucks .env (보안위해) mysql (DB 내용
mariaDB 다운로드 및 설치 Mariadb 설치 방법 offbyone.tistory.com/199 Windows 10에 MariaDB 설치하기 개발용으로 Windows 10 PC에 MariaDB 를 설치해 봅니다. 1. http://mariadb.org/ 에 접속하여 다운로드 페..
blckchainetc.tistory.com
--------------------------------------------------------------------------------------------------------------------------
| 5 | npm install mysql | mariaDB내용을 받기 위함 | package.json & node_modeules 췤 |
js 수정 (환경설정, 접속까지)
const express=require('express');
const nunjucks = require('nunjucks');
const bodyParser = require('body-parser')   //body parser 추가 1
const mysql = require('mysql');
const app = express();

nunjucks.configure('views',{
    express:app,
})

app.set('view engine', 'html');
app.use(bodyParser.urlencoded({extended:false})); //객체 들어감. 추가 2

let connection = mysql.createConnection({   //method라 () . 인자값- 객체
    host:'locahost',
    user:'root',
    password:'5353',
    database:'emily'
});
// 우리가 mysql 접속하기 위해 필요한 정보를 전달하기 위함  //여기까지 설정 끝

connection.connect();

app.get('/', (req,res)=>{
    res.render('index',{
        name:'emily',
        id:'덤블도어',
        pw:'1234',
    })
})

app.get('/join', (req,res)=>{
    res.render('join',{
        anything:req.query.textbox_content,
    })
})

app.post('/join',(req,res)=>{
    res.render('join.html',{
        anything:req.body.textbox_content,
    })
})

app.listen(3000,()=>{
    console.log('server start port:3000')
})
js수정 (이제 mariaDB를 사용하는 법)
post로 사용해보자

app.post('/join',(req,res)=>{


    connection.query("insert into handphone (name) values ('삼성')", (error, results)=>{
        if(error){
            console.log('error');
        }else{
            console.log('query문 성공 ');
        }
    }) //query라는 곳엔 2개의 인자값 (sql 문, 익명함수) =("sql",()=>{})


    res.render('join.html',{
        anything:req.body.textbox_content,
    })
})
'삼성' => req.body.textbox_content 로 바꾸면 입력한게 mariaDB에 저장됨.
*-uroot -proot
-> password root라
나는 5353써야해 list 수정 **
5. npm install dotenv
소스로서 감추고 싶은 정보를 담을 때 dotenv를 쓴다. (해커가 초보개발자 공격)
| 5 | npm install dotenv | db정보를 보낼 때 보안을 위해 다른 파일에 저장해서 불러오는 방식 | package.json & node_modeules 췤 |
JS
require('dotenv').config();
1. 최상단에 맨 위에 쓰기
2. .env 파일 만들기 (db내용들 & port 내용 많이 적음)
, ; 안해도됨.

여기까지 적음 (담기)
이제 env 사용하기
그럼 ㄱㅏ리면서 접속 가능
==============================서버만들기 정리==================================
1. express 로 서버 만들기
| no. | 할 거 | meaning | Changes or things to check |
| 1 | npm init | npm initiate | package.json 파일 생김 |
| 2 | npm install express | express 를 설치해라 | changes : node_modules 폴더 1개 & package-lock.json 파일 1개 생성 check ! : 1. package.json 안에 express가 추가 되었는지 2. node_modules 폴더 안 express파일 생겼는지 |
2. html 과 연결
| 3 | npm install nunjucks chokidar | nunjucks & chokidar 설치 ( != sendfile 처럼 단순하지않게 - 이건 값을 넘겨주진 못해 ) |
package.json & node_modeules 췤 |
3. app.post 쓰려면
| 4 | npm install body-parser | post위해 req.body 내용을 추출하기 위해 body-parser설치 | package.json & node_modeules 췤 |
4. MariaDB 연결
| 5 | npm install mysql | mariaDB내용을 받기 위함 | package.json & node_modeules 췤 |
5. npm install dotenv
| 6 | npm install dotenv | db정보를 보낼 때 보안을 위해 다른 파일에 저장해서 불러오는 방식 | package.json & node_modeules 췤 |
-----------------------------------------------------------소스----------------------------------------------------
JS
require('dotenv').config();
const express=require('express');
const nunjucks = require('nunjucks');
const bodyParser = require('body-parser')   //body parser 추가 1
const mysql = require('mysql');
const app = express();
const port = process.env.SERVER_PORT || 3000;

nunjucks.configure('views',{
    express:app,
})

app.set('view engine', 'html');
app.use(bodyParser.urlencoded({extended:false})); //객체 들어감. 추가 2

let connection = mysql.createConnection({   //method라 () . 인자값- 객체

    host:process.env.DB_HOST,
    user:process.env.DB_USER,
    password:process.env.DB_PASSWORD,
    database:process.env.DB_DATABASE
});
// 우리가 mysql 접속하기 위해 필요한 정보를 전달하기 위함  //여기까지 설정 끝

connection.connect();

app.get('/', (req,res)=>{
    res.render('index',{
        name:'emily',
        id:'덤블도어',
        pw:'1234',
    })
})

app.get('/join', (req,res)=>{
    res.render('join',{
        anything:req.query.textbox_content,
    })
})

app.post('/join',(req,res)=>{


    connection.query("insert into handphone (name) values ('${')", (error, results)=>{
        if(error){
            console.log('error');
        }else{
            console.log('query문 성공 ');
        }
    }) //query라는 곳엔 2개의 인자값 (sql 문, 익명함수) =("sql",()=>{})


    res.render('join.html',{
        anything:req.body.textbox_content,
    })
})

app.listen(port,()=>{
    console.log(`server start port:${port}`)
})
index.html
<!DOCTYPE html>
<html lang="en">
<head>
    <meta charset="UTF-8">
    <meta http-equiv="X-UA-Compatible" content="IE=edge">
    <meta name="viewport" content="width=device-width, initial-scale=1.0">
    <title>Document</title>
</head>
<body>
    내 이름은 {{name}}이야. <br/>
    내 아이디는 {{id}}야 <br/>
    내 비밀번호는 {{pw}}야

    <form method="post" action="/join">
    <input type="text" name="textbox_content" placeholder="이름을 적어주세요">
    <input type="submit" value="버튼">
    </form>
</body>
</html>
join.html
<!DOCTYPE html>
<html lang="en">
<head>
    <meta charset="UTF-8">
    <meta http-equiv="X-UA-Compatible" content="IE=edge">
    <meta name="viewport" content="width=device-width, initial-scale=1.0">
    <title>Document</title>
</head>
<body>
    say {{anything}}
</body>
</html>
env
SERVER_PORT=3000
DB_HOST=localhost
DB_USER=root
DB_PASSWORD=5353
DB_DATABASE=emily
숙제 : nunjucks에 대한 구문 알아오기 (if , etc..) - > 이전 숙제랑 함께 블로그 글로 따로 쓰기
질문
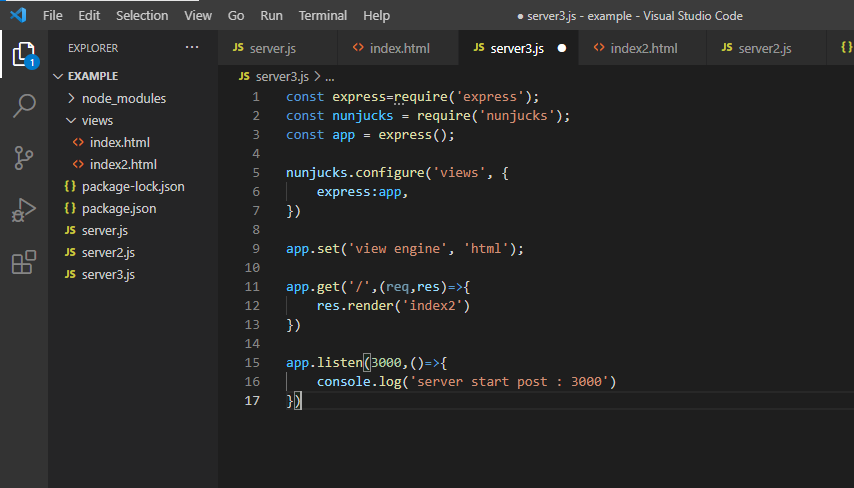
브라우저에 server3 + index2 가 안뜨는 이유
오늘의 복습은 자유롭게 원하는 html, js 를 만들어봐야겟따.


