

git flow vs github-flow 개념 이해
git-flow : 5가지의 Branches 를 이용/운영하는 브랜치 전략
한달 이상의 긴 호흡으로 개발하여 주기적으로 배포 , QA, hotfix 수행할 수 있는 여력이 있는 팀의 경우 적합
github-flow : master 브랜치와 Pull request를 활용한 단순한 브랜치 전략
항상 릴리즈되어야 할 필요가 있는 서비스와 지속적으로 테스트하고 배포하는 팀이라면 github-flow와 같은 간단한 workflow가 적합
Git Flow model
Main Branches
= long-running branches : they remain in your project during its whole lifetime.
1) Master
- 제품으로 출시될 수 있는 브랜치 ( main )
- master의 최신버전은 언제나 실행가능해야함
2) Develope
- 실행가능한 상태를 만들어가는 과정
- 다음 출시 버전을 개발하는 브랜치
Temporary Branches
merge 된 후 사라지는 임시 브랜치
3) feature
- 기능 개발하는 브랜치
- feature/기능명 으로 생성하고 사용 후 삭제
4) Release
- 이번 출시 버전을 준비하는 브랜치
- release/버전명 으로 생성하고 사용 후 삭제
- QA, TEST etc..
5) Hotfixes
- 출시한 버전에 긴급하게 수정해서 다시 업데이트 해야할 때
- hotfixes/차기 버전명 으로 생성하고 사용 후 삭제
- bugfix
GIt-flow 개발 프로세스

git-flow 개발 프로세스
1. 개발자는 develop branch 로부터 본인이 개발할 기능을 위한 feature branch 생성
2. feature branch에서 기능을 만들다가 기능 완성후에 develop branch에 merge
3. 이번 배포 버전의 기능들이 develop branch에 모두 merge 되었다면 QA, TEST 를 위해 release 브랜치 생성
4. release branch에서 오류가 발생한다면 release 브랜치 내에서 수정 , QA 가 끝났다면 해당 버전을 배포하기 위해 master branch로 merge한다. bugfix가 있었다면 해당 내용을 반영하기 위해 develop branch에도 merge
5. 만약 제품 (master)에서 버그가 발생한다면 hotfix branch 생성
6. hotfix branch에서 bugfix 끝나면 develop과 master branch에 각각 merge
Git-flow model 실전 연습
1) 기본 세팅
새로운 폴더 / 파일 (main.txt) 생성
생성한 폴더 경로에서 터미널 명령어 입력
git init
main.txt 에 코드 입력 후
git add main.txt
git commit -am "work 1"
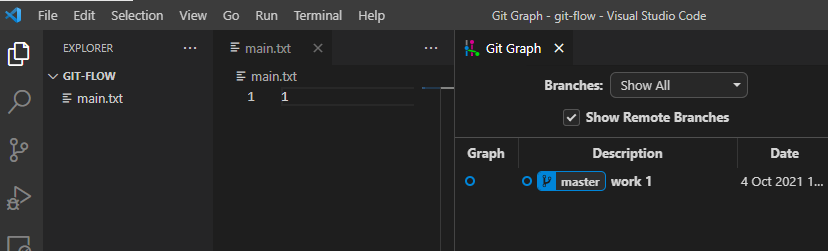
현재 완성된 master 제품을 출시한 상태라고 가정
현재 master 에 "0.1" 이라는 버전을 태그하기
git tag 0.1

이제 기능 추가 / 코드 작성 등등을 위한 develop branch를 만들기
2) develop branch 생성 및 기능 추가
git checkout -b develop

-> develop branch에서 기능 개선, 버그 수정 등의 코드 작성 후
git commit -am "work 2"
git commit -am "work 3"
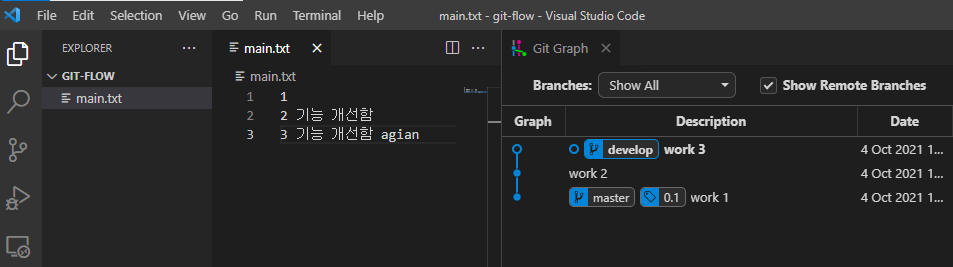
요렇게 develop line에서 기능 추가가 이루어짐
3) 출시, release 준비 & bugfix
* release braches 들은 언젠가 develop branch에 병합될 임시 브랜치이다
git checkout -b release/0.2
이전 출시가 0.1 버전이라 이번 출시 branch 이름을 release/0.2로 지음
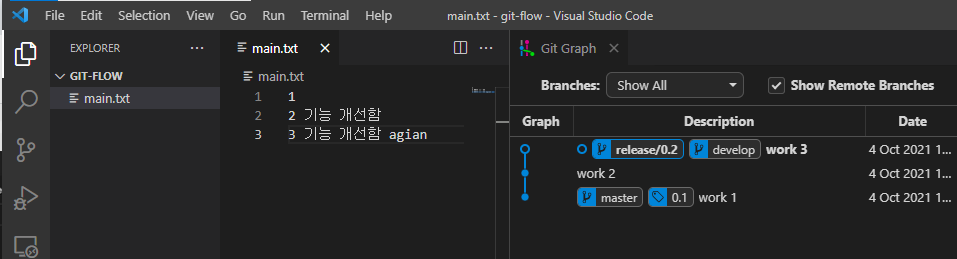
출시하려하는데 고쳐야할 버그들이 보이면 bugfix
release-02.txt 파일 생성 여기서 버그 수정 코드 작성
git add release-02.txt
git commit -am "release 0.2 1"
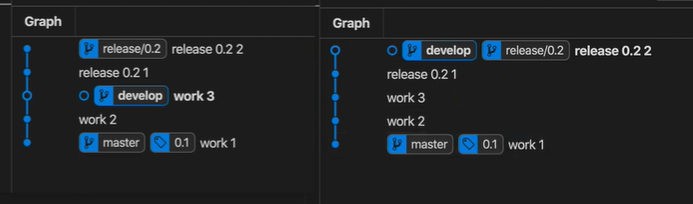
* 다시 버그 수정 코드 작성 후,
git commit -am "release 0.2 2"

4) release를 devlop 브랜치로 merge 하기
git checkout develop
git merge release/0.2
요런 과정을 반복하며 release준비가 끝나면 (잘 작동하는지 확인이 끝나면)
5) release 점검 완료 후 master로 no fast forward merge
*일반적인 merge(병합)가아닌 merge commit을 남기는 방식의 병합을 사용할 것
release/0.2가 있는 곳으로 Fast Forward할 것이기 때문에 병합이 어떻게 이루어져있는지 기록이 남겨지지않음 -> merge를 할 때 Fast Forward를 하지마 ! 라고 "--no-ff" 명령어 넣어주기
=> commit 메세지를 의도적으로 만드는 것 -> 여기서 release와 병합했다! 라고 commit log상 남기기
- 이렇게 하는 이유? 브랜치가 너무 많아지는 것을 방지
git checkout master
git merge --no-ff release/0.2

git branch -d release/0.2 // release 브랜치는 사용하고 삭제하는 임시 브랜치
git tag 0.2 // 다시 출시한 버젼 tag

-> 다시 keep 개발ing..
6) Feature Branches
다시 개발 시작 / 기능 추가 등등
git checkout develop
추가해야할 신규 기능이 두 가지가 있다고 가정 :
하나는 long-term, 다른 하나는 short-term이라하면 빨리 끝나는 short-term 기능 추가가 되면 먼저 release하고 master merge, 이후에 long-term 기능 추가가 완성되면 다시 반복
feature/short 과 feature/long이라는 기능 추가할 브랜치 생성
git branch feature/short
git branch feature/long
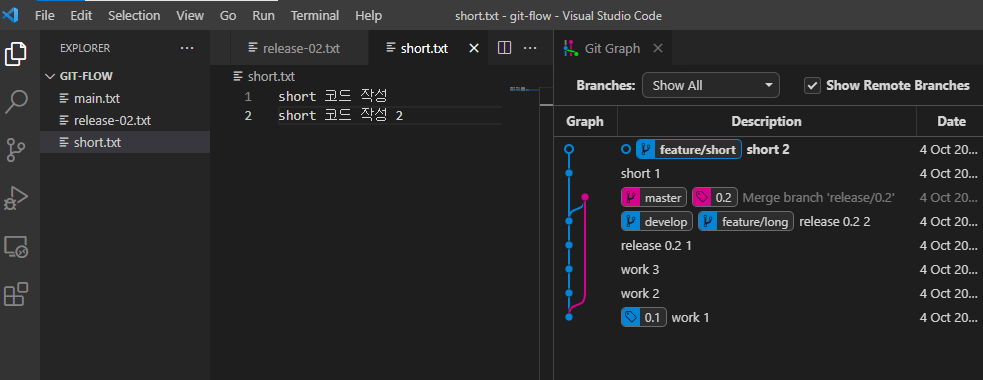
1.0버전을 목표로 하는 feature/short 부터 기능 추가
git checkout feature/short
short.txt 파일 생성 , 코드 작성 (commmit 2번 )
git add short.txt
git commit -am "short 1"
* 코드 추가
git add short.txt
git commit -am "short 2"
feature/long
git chechout feature/long
feature/long으로 checkout하면 방금 만들은 short.txt 파일이 사라져있음! 없었던 때로 돌아감
long.txt 파일 생성 + 코드 작성 + commit 2번 해주기 ! (기능 추가 시 2번 commit했다고 가정)
git add long.txt
git commit -am "long 1"
* 코드 추가 (이후에 add를 안해도 되었음! 위에선 에러(?)가 났었는데 이유는 무엇이지)
git commit -am "long 2"

출시 준비 -> feature 병합작업
git checout develop
git merge --no-ff feature/short // commit message를 일부러 만들어주기 by --no-ff
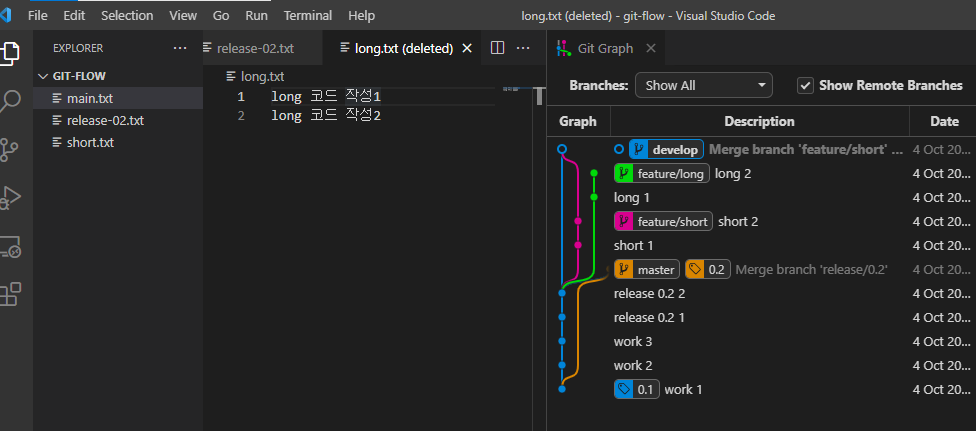
git branch -d feature/short
이제 release 절차 시작
새로운 release/1.0 브랜치 생성
git checkout -b release/1.0
만약 short에 문제가 있었다면 feature를 만드는게 아니라 그냥 그대로 bugfix 하기
short.txt 코드 수정 (but fix함)
git commit -am "short 3 bug fix"

기존의 main.txt에서도 bug fix 했다면
git commit -am "work 4 bug fix'

release/1.0 까지 merge 한 상태에서 bugfix를 해나가기 => release 준비 완료
7) release/1.0을 develop으로 병합, merge
git checkout develop
git merge --no-ff release/1.0

git checkout master
git merge --no-ff release/1.0

bugfix5 는 commit만하고 이후에 develop과 merge하지 않아서 저렇게 따로 가지처럼 떨어지게된듯..

git tag 1.0
git branch -d release/1.0 // 다 쓴 release/1.0 branch 삭제
-> 이제 출시 작업 시작하면 된다 !
8) 갑자기 긴급하게 수정해야할 문제 발생 시 => hotfix
다른 문제들을 해결하고 기능추가 작업을 하고 있는데 심각한 문제가 발생하면 신속하게 처리하기 위해 이전 출시 버전에 hotfix branch사용하여 추가 및 빠르게 업뎃
git checkout -b hotfixes/1.1
hotfix-1_1.txt 파일 생성 + 코드 작성
git add hotfix-1_1.txt
git commit -am "hotfix-1_1"
***** 여기서 master에도 보내고 & develop에도 보내서 충돌이 일어나지 않도록 하기 *****
git checkout develop
git merge --no-ff hotfixes/1.1
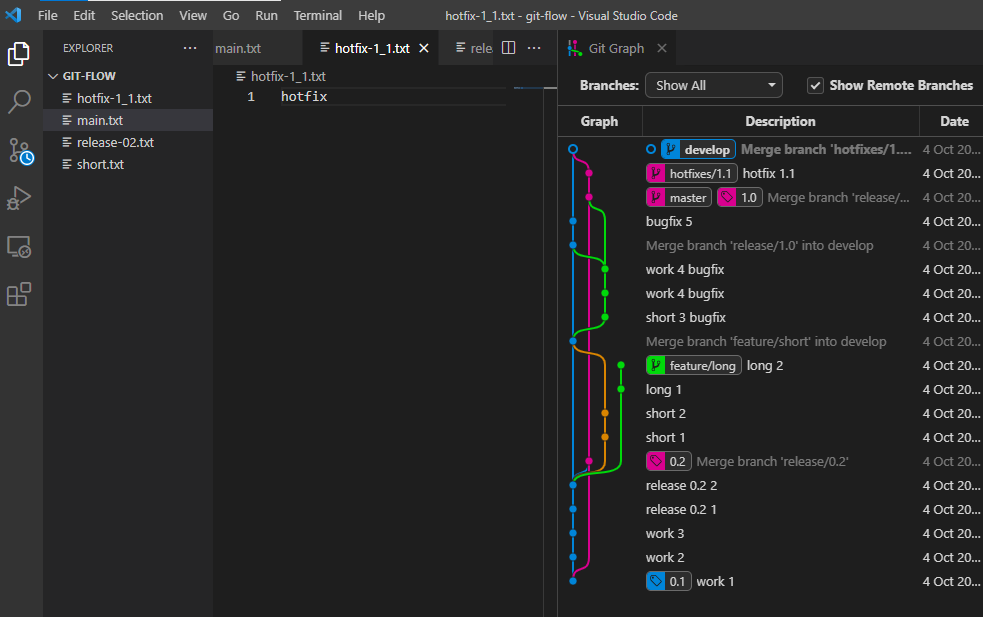
git chechout master
git merge --no-ff hotfixes/1.1
git tag 1.1 //1.1로 tag (출시)
git branch -d hotfixes/1.1 //삭제

9) feature/long merge
영상에서는 없었지만 feature/long 병합해보기
맞는지는 모르겟다ㅏㅏ
git checkout develop
git merge --no-ff feature/long
git branch -d feature/long
git checkout master
git merge --no-ff develop

References : 실전 연습 참고 from 생활코딩 https://www.youtube.com/watch?v=EzcF6RX8RrQ
https://www.git-tower.com/learn/git/ebook/en/command-line/advanced-topics/git-flow
Workflows with git-flow
Our learn section helps you get started with various web and software skills. Free online books, videos, and ebooks get you off the ground as quickly as possible.
www.git-tower.com
https://www.youtube.com/watch?v=jeaf8OXYO1g
'study' 카테고리의 다른 글
| [TEST CODE with mocha, should, sinon] stub mock spy before beforeEach after afterEach (0) | 2021.10.28 |
|---|---|
| macOS 개발 환경 구축 (0) | 2021.10.06 |
| NoSQL 이란 ? NoSQL 장점 단점 / 데이터 모델링 기법 정리 (0) | 2021.09.23 |
| HTTP/0.9 HTTP/1.0 HTTP/1.1 HTTP/2 차이 (0) | 2021.09.10 |
| CPU vs GPU (0) | 2021.09.08 |


