


1) expo settings
npm install -g expo-cli
expo init [project 명] ---> blank 선택
cd [project명] 으로 들어가기
npm start & emulator 실행
firebase - new project - 설정 -
sdk key? 코드들 복사해서 firebase.js 파일에 일단 붙여넣기
2) 아래 react navigations 설치
npm install @react-navigation/native
expo install react-native-gesture-handler react-native-reanimated react-native-screens react-native-safe-area-context
3) App.js 가장 위에 아래 명령어 작성
import 'react-native-gesture-handler';
만약 에러 나면 -> cache 삭제
ERROR : Expo Unable to resolve module
expo start --clear
위 명령어도 안되면 아래 내용 참고
How to clear the Expo and React Native packager caches (Metro, Watchman, Haste)
This guidance is from: Clearing bundler caches on macOS and Linux - Expo Documentation Clearing bundler caches on Windows - Expo Documentation When you’re unable to load a bundle, look at the packager logs or the error message displayed in the Expo clien
forums.expo.dev
import NavigationContainer & 요 변수로 감싸기
import 'react-native-gesture-handler';
import { StatusBar } from 'expo-status-bar';
import React from 'react';
import { StyleSheet, Text, View } from 'react-native';
import { NavigationContainer } from '@react-navigation/native'


export default function App() {
  return (
    <NavigationContainer>
      <View style={styles.container}>
        <Text>Let's build Signal </Text>
        <StatusBar style="auto" />
      </View>
    </NavigationContainer>
  );
}

const styles = StyleSheet.create({
  container: {
    flex: 1,
    backgroundColor: '#fff',
    alignItems: 'center',
    justifyContent: 'center',
  },
});
4) stack 다운
npm install @react-navigation/native-stack
and now let's build indivisual pages
The first page is Login page
screens 폴더 생성 > LoginScreen.js
단축키 : rnfes
import React from 'react'
import { StyleSheet, View, Text } from 'react-native'

const LoginScreen = () => {
    return (
        <View>
            <Text>I am login screen</Text>
        </View>
    )
}

export default LoginScreen

const styles = StyleSheet.create({

})
and now add the screen in App.js
import 'react-native-gesture-handler';
import { StatusBar } from 'expo-status-bar';
import React from 'react';
import { StyleSheet, Text, View } from 'react-native';
import { NavigationContainer } from '@react-navigation/native';
import { createStackNavigator } from '@react-navigation/stack'
import LoginScreen from './screens/LoginScreen';

const Stack = createStackNavigator()

export default function App() {
  return (
    <NavigationContainer>
      <Stack.Navigator>
        <Stack.Screen name='Login' component={LoginScreen} />
      </Stack.Navigator>
    </NavigationContainer>
  );
}

const styles = StyleSheet.create({
  container: {
    flex: 1,
    backgroundColor: '#fff',
    alignItems: 'center',
    justifyContent: 'center',
  },
});
title 위에 바꾸기
export default function App() {
  return (
    <NavigationContainer>
      <Stack.Navigator>
        <Stack.Screen options={{
            title:"Let's sign up"
        }} name='Login' component={LoginScreen} />
      </Stack.Navigator>
    </NavigationContainer>
  );
-> 테스트 후 options 일단 삭제
Stack.Navigator 자체에 screenOptions 를 주기
const Stack = createStackNavigator()
const globalScreenOptions={
    headerStyle: {backgroundColor:'#2C6BED'},
    headerTitleStyle:{color:'white'},
    headerTintColor:'white',
}

export default function App() {
  return (
    <NavigationContainer>
      <Stack.Navigator screenOptions={globalScreenOptions}>
        <Stack.Screen name='Login' component={LoginScreen} />
      </Stack.Navigator>
    </NavigationContainer>
  );
}
react native element
npm install react-native-elements
vector blabla 는 안해도 됨 -> expo에 있다!
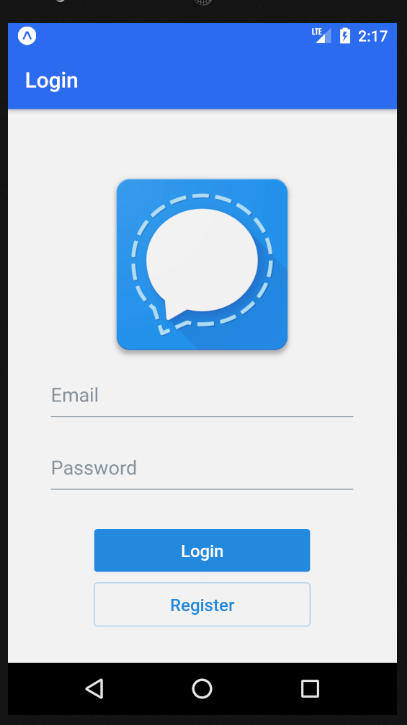
로고 넣기
import React from 'react'
import { StyleSheet, View, Text } from 'react-native'
import { Button, Input, Image } from 'react-native-elements'
import {StatusBar} from 'expo-status-bar';

const LoginScreen = () => {
    return (
        <View>
            <StatusBar style="light" />
            <Image source={{
                uri:"https://blog.mozilla.org/internetcitizen/files/2018/08/signal-logo.png"
            }}
            style={{width:200,height:200}} />
        </View>
    );
};

export default LoginScreen

const styles = StyleSheet.create({

})
email & password Input
useState 까지 만들기
import React, {useState} from 'react'
import { StyleSheet, View, Text } from 'react-native'
import { Button, Input, Image } from 'react-native-elements'
import {StatusBar} from 'expo-status-bar';

const LoginScreen = () => {
    const [email, setEmail] = useState('')
    const [password, setPassword] = useState('')

    return (
        <View>
            <StatusBar style="light" />
            <Image source={{
                uri:"https://blog.mozilla.org/internetcitizen/files/2018/08/signal-logo.png"
            }}
            style={{width:200,height:200}}
            />
            <View style={styles.inputContainer}>
                <Input placeholder="Email" autoFocus type="email"/>
                <Input placeholder="Password" secureTextEntry type="password"/>
            </View>
        </View>
    );
};

export default LoginScreen

const styles = StyleSheet.create({
    inputContainer:{

    },

})
해당 input boxes state 설정 + button 추가
onChange 가 웹상 e.target.value 로 여러 코드를 썼어야 했다면 app에서는
onChangeText={text=>setEmail(text)}
요렇게 간단하게 가능하다.
제일 밖에 있는 View -> KeyboardAvoidingView 로 바꾸기 + 정렬 중앙
이렇게 바꾸면 입력할 때 입력할 창이 키보드 위로 떠서 입력하는게 뭔지 보임
import React, {useState} from 'react'
import { KeyboardAvoidingView,StyleSheet, View, Text } from 'react-native'
import { Button, Input, Image } from 'react-native-elements'
import {StatusBar} from 'expo-status-bar';

const LoginScreen = () => {
    const [email, setEmail] = useState('')
    const [password, setPassword] = useState('')

    const SignIn =e=>{

    }

    return (
        <KeyboardAvoidingView behavior="padding" style={styles.container}>
            <StatusBar style="light" />
            <Image source={{
                uri:"https://blog.mozilla.org/internetcitizen/files/2018/08/signal-logo.png"
            }}
            style={{width:200,height:200}}
            />
            <View style={styles.inputContainer}>
                <Input
                    placeholder="Email"
                    autoFocus type="email"
                    value={email}
                    onChangeText={text=>setEmail(text)}
                />
                <Input
                    placeholder="Password"
                    secureTextEntry
                    type="password"
                    value={password}
                    onChangeText={text=>setPassword(text)}
                />
                <Button containerStyle={styles.button} onPress={SignIn} title='Login' />
                <Button containerStyle={styles.button} type="outline" title='Register' />
            </View>
        </KeyboardAvoidingView>
    );
};

export default LoginScreen

const styles = StyleSheet.create({
    container:{
        flex:1,
        alignItems:'center',
        justifyContent:'center',
        padding: 10,
    },
    inputContainer:{

    },
    button:{

    },

})
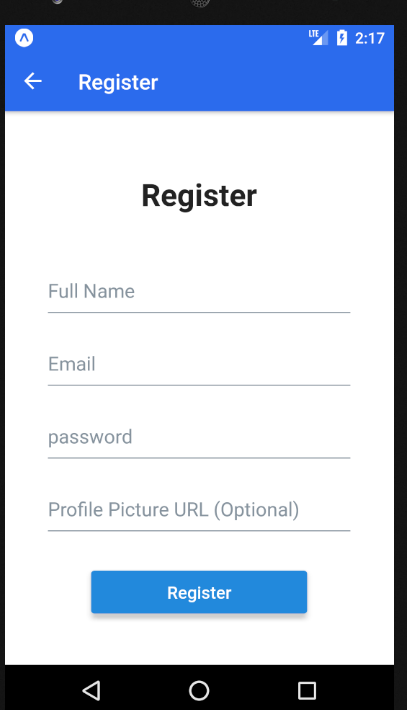
Register Screen 연결
screens > RegisterScreen.js 생성
rnfes
App.js
RegisterScreen 가져오기
import 'react-native-gesture-handler';
import React from 'react';
import { StyleSheet, Text, View } from 'react-native';
import { NavigationContainer } from '@react-navigation/native';
import { createStackNavigator } from '@react-navigation/stack'
import LoginScreen from './screens/LoginScreen';
import RegisterScreen from './screens/RegisterScreen'

const Stack = createStackNavigator()
const globalScreenOptions={
    headerStyle: {backgroundColor:'#2C6BED'},
    headerTitleStyle:{color:'white'},
    headerTintColor:'white',
}

export default function App() {
  return (
    <NavigationContainer>
      <Stack.Navigator screenOptions={globalScreenOptions}>
        <Stack.Screen name='Login' component={LoginScreen} />
        <Stack.Screen name='Register' component={RegisterScreen} />
      </Stack.Navigator>
    </NavigationContainer>
  );
}

const styles = StyleSheet.create({
  container: {
    flex: 1,
    backgroundColor: '#fff',
    alignItems: 'center',
    justifyContent: 'center',
  },
});
Register 클릭하면 pop screen on 하도록
App.js에서 Register screen 이 Stack.Navigator 안에 있기 때문에 navigation props 를 가져올 수 있다.
Register - {navigation} 추가
import React from 'react'
import { StyleSheet, Text, View } from 'react-native'

const RegisterScreen = ({navigation}) => {
    return (
LoginScreen = {navigation} 똑같이 추가
import React, { useState } from 'react'
import { KeyboardAvoidingView, StyleSheet, View, Text } from 'react-native'
import { Button, Input, Image } from 'react-native-elements'
import { StatusBar } from 'expo-status-bar';

const LoginScreen = ({navigation}) => {
    const [email, setEmail] = useState('')
    const [password, setPassword] = useState('')
<Button containerStyle={styles.button} onPress={SignIn} title='Login' />
<Button
onPress = {()=>navigation.navigate('Register')}
containerStyle={styles.button}
type="outline"
title='Register'
/>navigation 사용 방법 : onPress = {()=> navigation.navigate('Register')}
props로 받은 navigation에 있는 매서드 .navigate를 사용해서 안에 string 값으로 해당 component이름 넣어주기 -> app.js에서 쓴 name="Register" 와 연결됨
ResgisterScreen
View -> KeyboardAvoidingView로 바꾸기 등등
react-native의 Text에서 react-native-elements의 Text로 바꾸기
import React,{useState} from 'react'
import { KeyboardAvoidingView, StyleSheet, View } from 'react-native'
import {StatusBar} from 'expo-status-bar';
import { Input, Button,Text } from 'react-native-elements';

const RegisterScreen = ({navigation}) => {
    const [name, setName] = useState('')
    const [email, setEmail] = useState('')
    const [password, setPassword] = useState('')
    const [imageUrl, setImageUrl] = useState('')

    const register=e=>{

    }

    return (
        <KeyboardAvoidingView behavior="padding" style={styles.container}>
            <StatusBar style="light"/>
            <Text h3 style={{marginBottom:50}}>
                Register
            </Text>
            <View style={styles.inputContainer}>
                <Input
                    placeholder="Full Name"
                    autofocus
                    type="text"
                    value={name}
                    onChangeText={(text)=>setName(text)}
                />
                <Input
                    placeholder="Email"
                    type="email"
                    value={email}
                    onChangeText={(text)=>setEmail(text)}
                />
                <Input
                    placeholder="password"
                    type="password"
                    value={password}
                    secureTextEntry
                    onChangeText={(text)=>setPassword(text)}
                />
                <Input
                    placeholder="Profile Picture URL (Optional)"
                    type="text"
                    value={imageUrl}
                    onChangeText={(text)=>setImageUrl(text)}
                    onSubmitEditing={register} // 마지막 다 입력하면 submit
                />
            </View>
            <Button
                onPress={register}  // 버튼 눌러도 submit
                raised
                title="Register"
                containerStyle={styles.button}

            />
        </KeyboardAvoidingView>
    )
}

export default RegisterScreen

const styles = StyleSheet.create({
    container:{
        flex:1,
        alignItems:"center",
        justifyContent:'center',
        padding:10,
        backgroundColor:"white",
    },
    inputContainer:{
        width:300,
    },
    button:{
        width:200,
        marginTop:10,
    },

})
useLayoutEffect 사용
import React,{useState,useLayoutEffect} from 'react'
import { KeyboardAvoidingView, StyleSheet, View } from 'react-native'
import {StatusBar} from 'expo-status-bar';
import { Input, Button,Text } from 'react-native-elements';

const RegisterScreen = ({navigation}) => {
    const [name, setName] = useState('')
    const [email, setEmail] = useState('')
    const [password, setPassword] = useState('')
    const [imageUrl, setImageUrl] = useState('')

    useLayoutEffect(()=>{
        navigation.setOptions({
            headerBackTitle:'Back to Login',

        })
    },[navigation])
firebase - authentication - start - email enabled
-> database - test mode -> 시작
아까 복붙해놓은 firebase key 파일
google ----> expo firebase
expo install firebase
firebase.js 코드 추가
import firebase from 'firebase/app'

const firebaseConfig = {
  apiKey: "AIzaSyBzsgi5Pt1p_DsM9Zq4",
  authDomain: "signal-clone-yrebaseapp.com",
  projectId: "signalb8",
  storageBucket: "signal-clone-yt.appspot.com",
  messagingSenderId: "638941",
  appId: "1:6389641:web:38a7fa43578"
};

let app;

if (firebase.apps.length === 0) {
  app = firebase.initializeApp(firebaseConfig)
} else {
  app = firebase.app();
}

const db = app.firestore();
const auth=firebase.auth();

export {db, auth};
Register.js
import React,{useState,useLayoutEffect} from 'react'
import { KeyboardAvoidingView, StyleSheet, View } from 'react-native'
import {StatusBar} from 'expo-status-bar';
import { Input, Button,Text } from 'react-native-elements';
import {auth} from '../firebase'

const RegisterScreen = ({navigation}) => {
    const [name, setName] = useState('')
    const [email, setEmail] = useState('')
    const [password, setPassword] = useState('')
    const [imageUrl, setImageUrl] = useState('')

    useLayoutEffect(()=>{
        navigation.setOptions({
            headerBackTitle:'Back to Login',

        })
    },[navigation])

    const register=e=>{
        auth.createUserWithEmailAndPassword(email,password)
        .then(authUser=>{
            authUser.user.updateProfile({
                displayName:name,
                photoURL:imageUrl || "http://www.connectingcouples.us/wp-content/uploads/2019/07/avatar-placeholder.png",
            })
        }).catch(error=>alert(error.message))
    }
loginScreen
import React, { useState, useEffect } from 'react'
import { KeyboardAvoidingView, StyleSheet, View, Text } from 'react-native'
import { Button, Input, Image } from 'react-native-elements'
import { StatusBar } from 'expo-status-bar';
import { auth } from '../firebase';
const LoginScreen = ({navigation}) => {
const [email, setEmail] = useState('')
const [password, setPassword] = useState('')
useEffect(()=>{
const unsubscribe = auth.onAuthStateChanged((authUser)=>{
if(authUser){
navigation.replace('home')
}
})
return unsubscribe
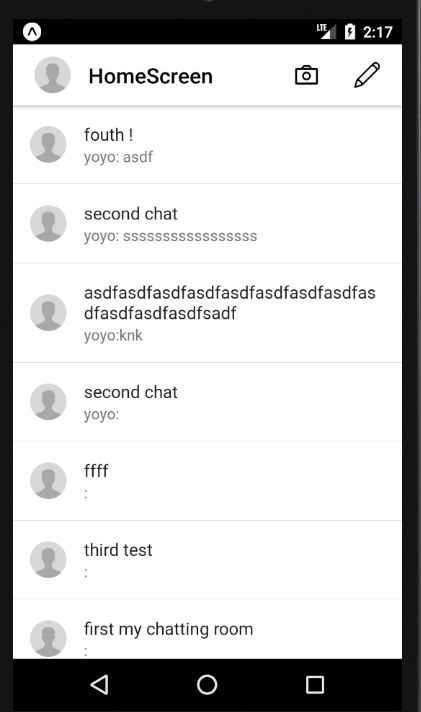
},[])home screen 만들기
App.js
        <Stack.Screen name='Login' component={LoginScreen} />
        <Stack.Screen name='Register' component={RegisterScreen} />
        <Stack.Screen name='Home' component={HomeScreen} />
components 폴더 생성 > CustomListItem.js 파일 생성 -> rnfes
import React from 'react'
import { StyleSheet, Text, View } from 'react-native'
import { ListItem, Avatar } from 'react-native-elements'

const CustomListItem = () => {
    return (
        <ListItem>
            <Avatar
               rounded
               source={{
                   uri:"http://www.connectingcouples.us/wp-content/uploads/2019/07/avatar-placeholder.png"
               }}
            >
            </Avatar>
        </ListItem>
    )
}

export default CustomListItem

const styles = StyleSheet.create({})
HomeScreen.js
import React from 'react'
import { ScrollView, SafeAreaView, StyleSheet, Text } from 'react-native'
import CustomListItem from '../components/CustomListItem'

const HomeScreen = () => {
    return (
        <SafeAreaView>
            <ScrollView>
                <CustomListItem/>
            </ScrollView>
        </SafeAreaView>
    )
}

export default HomeScreen

const styles = StyleSheet.create({})
numberOfLines={1}로 설정함 !
import React from 'react'
import { StyleSheet, Text, View } from 'react-native'
import { ListItem, Avatar } from 'react-native-elements'

const CustomListItem = () => {
    return (
        <ListItem>
            <Avatar
               rounded
               source={{
                   uri:"http://www.connectingcouples.us/wp-content/uploads/2019/07/avatar-placeholder.png"
               }}
            />
            <ListItem.Content>
                <ListItem.Title style={{fontWeight:'800'}}>
                    Youtube chat
                </ListItem.Title>
                <ListItem.Subtitle numberOfLines={1} ellipsizeMode="tail">
                    This is subtitleThis is subtitleThis is subtitleThis is subtitleThis is subtitleThis i
                </ListItem.Subtitle>
            </ListItem.Content>
        </ListItem>
    )
}

export default CustomListItem

const styles = StyleSheet.create({})
Home Screen 왼쪽에 사용자 나오도록
HomeScreen.js
import React, { useLayoutEffect } from 'react'
import {
    ScrollView, SafeAreaView, StyleSheet,
    TouchableOpacity, Text, View
} from 'react-native'
import CustomListItem from '../components/CustomListItem'
import { Avatar } from 'react-native-elements';
import { auth, db } from '../firebase';

const HomeScreen = ({ navigation }) => {

    useLayoutEffect(() => {
        navigation.setOptions({
            title: 'HomeScreen ',
            headerStyle: { backgroundColor: '#fff' },
            headerTitleStyle: { color: "black" },
            headerTintColor: 'black',
            headerLeft: () => (
                <View style={{ marginLeft: 20 }}>
                    <TouchableOpacity>
                        <Avatar rounded source={{ uri: auth?.currentUser?.photoURL }} />
                    </TouchableOpacity>
                </View>
            )
        })
    }, [])
Login button 기능 추가
LoginScreen.js 마지막 input & login button에 함수 추가
                <Input
                    placeholder="Password"
                    secureTextEntry
                    type="password"
                    value={password}
                    onChangeText={text => setPassword(text)}
                    onSubmit={SignIn}
                />
            </View>
            {/* <View style={{height:100}}/> */}
            <Button
                containerStyle={styles.button}
                onPress={SignIn}
auth 가져와서 auth.signInWithEmailAndPassword
import { auth } from '../firebase';


const LoginScreen = ({navigation}) => {
    const [email, setEmail] = useState('')
    const [password, setPassword] = useState('')

    useEffect(()=>{
        const unsubscribe = auth.onAuthStateChanged((authUser)=>{
            if(authUser){
                navigation.replace('Home')
            }
        })
        return unsubscribe
    },[])

    const SignIn = e => {
        auth.signInWithEmailAndPassword(email,password)
        .catch(error=>alert(error))
    }
user pic 누르면 sign out 되도록
const HomeScreen = ({ navigation }) => {

    const signOutUser=()=>{
        auth.signOut().then(()=>{
            navigation.replace('Login')
        })
    }

    useLayoutEffect(() => {
        navigation.setOptions({
            title: 'HomeScreen ',
            headerStyle: { backgroundColor: '#fff' },
            headerTitleStyle: { color: "black" },
            headerTintColor: 'black',
            headerLeft: () => (
                <View style={{ marginLeft: 20 }}>
                    <TouchableOpacity activeOpacity={0.5} onPress={signOutUser}>
                        <Avatar rounded source={{ uri: auth?.currentUser?.photoURL }} />
                    </TouchableOpacity>
                </View>
            )
=> 여기까지 register -> 로그인 하면 -> homescreen -> logout 까지 됨
firebase의 authentication에 register한 메일들이 쭉있음.. 신기
Header right icons 추가
import React, { useLayoutEffect } from 'react'
import {
    ScrollView, SafeAreaView, StyleSheet,
    TouchableOpacity, Text, View
} from 'react-native'
import CustomListItem from '../components/CustomListItem'
import { Avatar } from 'react-native-elements';
import { auth, db } from '../firebase';
import { AntDesign, SimpleLineIcons } from '@expo/vector-icons'

const HomeScreen = ({ navigation }) => {

    const signOutUser = () => {
        auth.signOut().then(() => {
            navigation.replace('Login')
        })
    }

    useLayoutEffect(() => {
        navigation.setOptions({
            title: 'HomeScreen ',
            headerStyle: { backgroundColor: '#fff' },
            headerTitleStyle: { color: "black" },
            headerTintColor: 'black',
            headerLeft: () => (
                <View style={{ marginLeft: 20 }}>
                    <TouchableOpacity activeOpacity={0.5} onPress={signOutUser}>
                        <Avatar rounded source={{ uri: auth?.currentUser?.photoURL }} />
                    </TouchableOpacity>
                </View>
            ),
            headerRight: () => (
                <View style={{
                    flexDirection: "row",
                    justifyContent: "space-between",
                    width: 80,
                    marginRight: 20,
                }}>
                    <TouchableOpacity activeOpacity={0.5}>
                        <AntDesign name="camerao" size={24} color="black" />
                    </TouchableOpacity>
                    <TouchableOpacity activeOpacity={0.5}>
                        <AntDesign name="pencil" size={24} color="black" />
                    </TouchableOpacity>
                </View>
            )
        })
    }, [])

    return (
        <SafeAreaView>
            <ScrollView>
                <CustomListItem />
            </ScrollView>
        </SafeAreaView>
    )
}

export default HomeScreen

const styles = StyleSheet.create({})
()=>() -> means direct return
아이콘 pencil 누르면 채팅방 추가하기
HomeScreen
                    <TouchableOpacity onPress={()=>navigation.navigater('AddChat')} activeOpacity={0.5}>
                        <AntDesign name="pencil" size={24} color="black" />
                    </TouchableOpacity>
App.js
import AddChatScreen from './screens/AddChatScreen'  //추가 1

.
.
.

        <Stack.Screen name='Register' component={RegisterScreen} />
        <Stack.Screen name='Home' component={HomeScreen} />
        <Stack.Screen name='AddChat' component={AddChatScreen} />    //추가 2
screens > AppChatScreen.js 생성
import React from 'react'
import { StyleSheet, Text, View } from 'react-native'

const AddChatScreen = ({ navigation }) => {
    return (
        <View>
            <Text>add chat screen</Text>
        </View>
    )
}

export default AddChatScreen

const styles = StyleSheet.create({})
AddchatScreen.js
import React, { useState,useLayoutEffect } from 'react'
import { StyleSheet, Text, View } from 'react-native'
import { Button, Input } from 'react-native-elements'
import Icon from 'react-native-vector-icons/FontAwesome';

const AddChatScreen = ({ navigation }) => {

    const [input, setInput] = useState('')


    useLayoutEffect(()=>{
        navigation.setOptions({
            title:'Add a new Chat',
            headerBackTitle:"chats",  //요 title은 웹에서는 안나오고 ios나옴
        })
    },[])

    return (
        <View style={styles.container}>
            <Input
                placeholder="Enter a chat name"
                value={input}
                onChangeText={(text)=>setInput(text)}
                leftIcon={
                    <Icon name="wechat" type="antdesign" size={24} color="orange"/>
                }
            />
        </View>
    )
}

export default AddChatScreen

const styles = StyleSheet.create({
    dontainer:{

    },

})
저기에 쓴 chats ios 예시
`db add
import React, { useState,useLayoutEffect } from 'react'
import { StyleSheet, Text, View } from 'react-native'
import { Button, Input } from 'react-native-elements'
import Icon from 'react-native-vector-icons/FontAwesome';
import {db} from '../firebase'

const AddChatScreen = ({ navigation }) => {

    const [input, setInput] = useState('')

    const createChat= async()=>{
        await db.collection('chats').add({              // chats 요게 table 이름인듯
            chatName:input
        }).then(()=>{
            navigation.goBack()
        }).catch(error => alert(error))
    }

    useLayoutEffect(()=>{
        navigation.setOptions({
            title:'Add a new Chat',
            headerBackTitle:"chats",  //요 title은 웹에서는 안나오고 ios나옴
        })
    },[])

    return (
        <View style={styles.container}>
            <Input
                placeholder="Enter a chat name"
                value={input}
                onChangeText={(text)=>setInput(text)}
                //onSubmitEditing={createChat}   <-------------------------얘를 주석처리해야 db에 1개만 뜬다 안그러면 두개씩 뜸
                leftIcon={
                    <Icon name="wechat" type="antdesign" size={24} color="orange"/>
                }
            />
            <Button onPress={createChat} title='Create new Chat' />
        </View>
    )
}

export default AddChatScreen

const styles = StyleSheet.create({
    dontainer:{

    },

})
db에는 생기지만 아직 화면에는 new chat room 이 안뜬다
db에 있는 chats lists screen에 띄우기
homeScreen.js
chats list state 만들기
useEffect
import React, { useLayoutEffect, useState, useEffect } from 'react'
import {
    ScrollView, SafeAreaView, StyleSheet,
    TouchableOpacity, Text, View
} from 'react-native'
import CustomListItem from '../components/CustomListItem'
import { Avatar } from 'react-native-elements';
import { auth, db } from '../firebase';
import { AntDesign, SimpleLineIcons } from '@expo/vector-icons'

const HomeScreen = ({ navigation }) => {

    const [chats, setChats] = useState([])


    const signOutUser = () => {
        auth.signOut().then(() => {
            navigation.replace('Login')
        })
    }

    useEffect(() => {
        const unsubscribe = db.collection('chats').onSnapshot((snapshot) => (
            setChats(snapshot.docs.map((doc) => ({
                id: doc.id,
                data: doc.data(),
            })))
        ))
        return unsubscribe;
    }, []) // 처음에만 실행

    useLayoutEffect(() => {
        navigation.setOptions({
            title: 'HomeScreen ',
            headerStyle: { backgroundColor: '#fff' },
            headerTitleStyle: { color: "black" },
            headerTintColor: 'black',
            headerLeft: () => (
                <View style={{ marginLeft: 20 }}>
                    <TouchableOpacity activeOpacity={0.5} onPress={signOutUser}>
                        <Avatar rounded source={{ uri: auth?.currentUser?.photoURL }} />
                    </TouchableOpacity>
                </View>
            ),
            headerRight: () => (
                <View style={{
                    flexDirection: "row",
                    justifyContent: "space-between",
                    width: 80,
                    marginRight: 20,
                }}>
                    <TouchableOpacity activeOpacity={0.5}>
                        <AntDesign name="camerao" size={24} color="black" />
                    </TouchableOpacity>
                    <TouchableOpacity onPress={() => navigation.navigate('AddChat')} activeOpacity={0.5}>
                        <SimpleLineIcons name="pencil" size={24} color="black" />
                    </TouchableOpacity>
                </View>
            )
        })
    }, [])

    return (
        <SafeAreaView>
            <ScrollView>
                {chats.map(({ id, data: { chatName } })=>(
                    <CustomListItem id={id} chatName={chatName} key={id}/>
                ))}
            </ScrollView>
        </SafeAreaView>
    )
}

export default HomeScreen

const styles = StyleSheet.create({})
CustomListItem.js
import React from 'react'
import { StyleSheet, Text, View } from 'react-native'
import { ListItem, Avatar } from 'react-native-elements'

const CustomListItem = ({id,chatName,enterChat}) => {
    return (
        <ListItem key={id} bottomDivider >
            <Avatar
               rounded
               source={{
                   uri:"http://www.connectingcouples.us/wp-content/uploads/2019/07/avatar-placeholder.png"
               }}
            />
            <ListItem.Content>
                <ListItem.Title style={{fontWeight:'800'}}>
                    {chatName}
                </ListItem.Title>
                <ListItem.Subtitle numberOfLines={1} ellipsizeMode="tail">
                    ABC
                </ListItem.Subtitle>
            </ListItem.Content>
        </ListItem>
    )
}

export default CustomListItem

const styles = StyleSheet.create({})
Chat room name 클릭해서 들어가기
customListItem.js - onPress 넣기
const CustomListItem = ({id,chatName,enterChat}) => {
    return (
        <ListItem onPress={()=>enterChat(id,chatName)} key={id} bottomDivider >
            <Avatar
               rounded
screens> ChatScreen.js 새 파일 생성
App.js 가져오기
import ChatScreen from './screens/ChatScreen'
.
.
.

        <Stack.Screen name='Home' component={HomeScreen} />
        <Stack.Screen name='AddChat' component={AddChatScreen} />
        <Stack.Screen name='Chat' component={ChatScreen} />
HomScreen.js
                    <TouchableOpacity onPress={() => navigation.navigate('AddChat')} activeOpacity={0.5}>
                        <SimpleLineIcons name="pencil" size={24} color="black" />
                    </TouchableOpacity>
const enterChat=(id,chatName)=>{
navigation.navigate('Chat',{
id, chatName
})
}navigate 두 번째 인자로 받은 params 보내기
chatScreen.js 에서 props 로 navigation & route 두 개 받기
route 안에 params 라는 매서드 있음
import React from 'react'
import { StyleSheet, Text, View } from 'react-native'

const ChatScreen = ({navigation, route}) => {
    return (
        <View>
            <Text>{route.params.chatName}</Text>
        </View>
    )
}

export default ChatScreen

const styles = StyleSheet.create({})
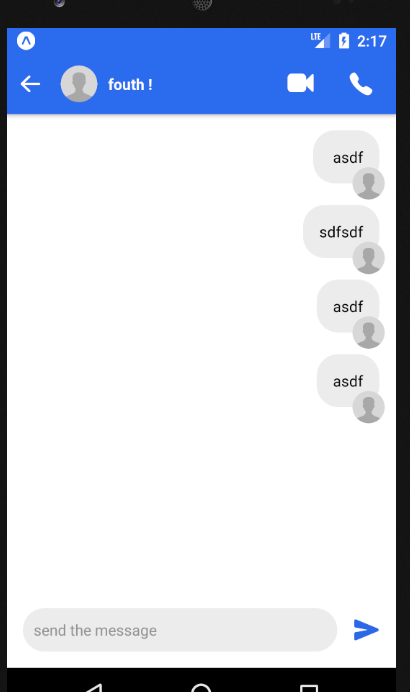
and now customize the top session
import React, { useLayoutEffect } from 'react'
import { StyleSheet, Text, View } from 'react-native'
import { Avatar } from 'react-native-elements';

const ChatScreen = ({ navigation, route }) => {

    useLayoutEffect(() => {
        navigation.setOptions({
            title: 'Chat',
            headerBackTitleVisible: false,
            headerTitleAlign: 'left',
            headerTitle: () => (
                <View style={{
                    flexDirection:'row',
                    alignItems:'center',
                }}>
                    <Avatar
                        rounded
                        source={{
                        uri:"http://www.connectingcouples.us/wp-content/uploads/2019/07/avatar-placeholder.png"
                        }}
                    />
                    <Text style={{
                        color:'white',
                        marginLeft:10,
                        fontWeight:'700',
                    }}>
                        {route.params.chatName}
                    </Text>
                </View>
            ),
        })
    }, [navigation])

    return (
        <View>
            <Text>{route.params.chatName}</Text>
        </View>
    )
}

export default ChatScreen

const styles = StyleSheet.create({})
changing the arrow on the left - 근데 바꾼게 원래 화살표와 같음
import React, { useLayoutEffect } from 'react'
import { StyleSheet, Text, Touchable, TouchableOpacity, View } from 'react-native'
import { Avatar } from 'react-native-elements';
import { AntDesign, FontAwesome, Ionicons } from '@expo/vector-icons';

const ChatScreen = ({ navigation, route }) => {

    useLayoutEffect(() => {
        navigation.setOptions({
            title: 'Chat',
            headerBackTitleVisible: false,
            headerTitleAlign: 'left',
            headerTitle: () => (
                <View style={{
                    flexDirection:'row',
                    alignItems:'center',
                }}>
                    <Avatar
                        rounded
                        source={{
                        uri:"http://www.connectingcouples.us/wp-content/uploads/2019/07/avatar-placeholder.png"
                        }}
                    />
                    <Text style={{
                        color:'white',
                        marginLeft:10,
                        fontWeight:'700',
                    }}>
                        {route.params.chatName}
                    </Text>
                </View>
            ),
            headerLeft:()=>(
                <TouchableOpacity
                    style={{marginLeft:10 }}
                    onPress={navigation.goBack}
                >
                    <AntDesign name="arrowleft" size={24} color='white' />
                </TouchableOpacity>
            )
        })
    }, [navigation])

    return (
        <View>
            <Text>{route.params.chatName}</Text>
        </View>
    )
}

export default ChatScreen

const styles = StyleSheet.create({})
화살표 누르면 뒤로가게 만들기
            headerLeft:()=>(
                <TouchableOpacity
                    style={{marginLeft:10 }}
                    onPress={navigation.goBack}
                >
                    <AntDesign name="arrowleft" size={24} color='white' />
                </TouchableOpacity>
            )
비디오 콜, 카메라 icons 넣기
import React, { useLayoutEffect } from 'react'
import { StyleSheet, Text, Touchable, TouchableOpacity, View } from 'react-native'
import { Avatar } from 'react-native-elements';
import { AntDesign, FontAwesome, Ionicons } from '@expo/vector-icons';

const ChatScreen = ({ navigation, route }) => {

    useLayoutEffect(() => {
        navigation.setOptions({
            title: 'Chat',
            headerBackTitleVisible: false,
            headerTitleAlign: 'left',
            headerTitle: () => (
                <View style={{
                    flexDirection:'row',
                    alignItems:'center',
                }}>
                    <Avatar
                        rounded
                        source={{
                        uri:"http://www.connectingcouples.us/wp-content/uploads/2019/07/avatar-placeholder.png"
                        }}
                    />
                    <Text style={{
                        color:'white',
                        marginLeft:10,
                        fontWeight:'700',
                    }}>
                        {route.params.chatName}
                    </Text>
                </View>
            ),
            headerLeft:()=>(
                <TouchableOpacity
                    style={{marginLeft:10 }}
                    onPress={navigation.goBack}
                >
                    <AntDesign name="arrowleft" size={24} color='white' />
                </TouchableOpacity>
            ),
            headerRight:()=>(
                <View style={{
                    flexDirection:'row',
                    justifyContent:'space-between',
                    width:80,
                    marginRight:20,
                }}>
                    <TouchableOpacity>
                        <FontAwesome name="video-camera" size={24} color="white"/>
                    </TouchableOpacity>
                    <TouchableOpacity>
                        <Ionicons name="call" size={24} color="white"/>
                    </TouchableOpacity>
                </View>
            ),
        })
    }, [navigation])

    return (
        <View>
            <Text>{route.params.chatName}</Text>
        </View>
    )
}

export default ChatScreen

const styles = StyleSheet.create({})
ChatScreen 수정
import React, { useLayoutEffect, useState } from 'react'
import { StyleSheet, Text, Touchable, SafeAreaView,
    TouchableOpacity, View, KeyboardAvoidingView,
     Platform, ScrollView, TextInput } from 'react-native'
import { Avatar } from 'react-native-elements';
import { AntDesign, FontAwesome, Ionicons } from '@expo/vector-icons';
// import { SafeAreaView } from 'react-native-safe-area-context';
import { StatusBar } from 'expo-status-bar';

const ChatScreen = ({ navigation, route }) => {

    const [input, setInput] = useState('')

    useLayoutEffect(() => {
        navigation.setOptions({
            title: 'Chat',
            headerBackTitleVisible: false,
            headerTitleAlign: 'left',
            headerTitle: () => (
                <View style={{
                    flexDirection:'row',
                    alignItems:'center',
                }}>
                    <Avatar
                        rounded
                        source={{
                        uri:"http://www.connectingcouples.us/wp-content/uploads/2019/07/avatar-placeholder.png"
                        }}
                    />
                    <Text style={{
                        color:'white',
                        marginLeft:10,
                        fontWeight:'700',
                    }}>
                        {route.params.chatName}
                    </Text>
                </View>
            ),
            headerLeft:()=>(
                <TouchableOpacity
                    style={{marginLeft:10 }}
                    onPress={navigation.goBack}
                >
                    <AntDesign name="arrowleft" size={24} color='white' />
                </TouchableOpacity>
            ),
            headerRight:()=>(
                <View style={{
                    flexDirection:'row',
                    justifyContent:'space-between',
                    width:80,
                    marginRight:20,
                }}>
                    <TouchableOpacity>
                        <FontAwesome name="video-camera" size={24} color="white"/>
                    </TouchableOpacity>
                    <TouchableOpacity>
                        <Ionicons name="call" size={24} color="white"/>
                    </TouchableOpacity>
                </View>
            ),
        })
    }, [navigation])

    return (
        <SafeAreaView style={{flex:1, backgroundColor:'white' }}>
            <StatusBar style="light"/>
            <KeyboardAvoidingView
                behavior={Platform.OS ==='ios' ? "padding":"height"}
                style={styles.container}
                keyboardVerticalOffset={90}
            >
                <>
                    <ScrollView>     {/* Chat goes here */}


                    </ScrollView>
                    {/* Typing msg area */}
                    <View style={styles.footer}>
                        <TextInput
                            placeholder="message"
                            style={styles.textInput}
                            value={input}
                            onChangeText={(text)=>setInput(text)}
                        />
                    </View>
                </>
            </KeyboardAvoidingView>
        </SafeAreaView>
    )
}

export default ChatScreen

const styles = StyleSheet.create({
    container:{

    },
    footer:{

    },
    testInput:{

    },
})
Input box
import React, { useLayoutEffect, useState } from 'react'
import { StyleSheet, Text, Touchable, SafeAreaView,
    TouchableOpacity, View, KeyboardAvoidingView,
     Platform, ScrollView, TextInput } from 'react-native'
import { Avatar } from 'react-native-elements';
import { AntDesign, FontAwesome, Ionicons } from '@expo/vector-icons';
// import { SafeAreaView } from 'react-native-safe-area-context';
import { StatusBar } from 'expo-status-bar';

const ChatScreen = ({ navigation, route }) => {

    const [input, setInput] = useState('')

    const sendMessage =()=>{

    }

    useLayoutEffect(() => {
        navigation.setOptions({
            title: 'Chat',
            headerBackTitleVisible: false,
            headerTitleAlign: 'left',
            headerTitle: () => (
                <View style={{
                    flexDirection:'row',
                    alignItems:'center',
                }}>
                    <Avatar
                        rounded
                        source={{
                        uri:"http://www.connectingcouples.us/wp-content/uploads/2019/07/avatar-placeholder.png"
                        }}
                    />
                    <Text style={{
                        color:'white',
                        marginLeft:10,
                        fontWeight:'700',
                    }}>
                        {route.params.chatName}
                    </Text>
                </View>
            ),
            headerLeft:()=>(
                <TouchableOpacity
                    style={{marginLeft:10 }}
                    onPress={navigation.goBack}
                >
                    <AntDesign name="arrowleft" size={24} color='white' />
                </TouchableOpacity>
            ),
            headerRight:()=>(
                <View style={{
                    flexDirection:'row',
                    justifyContent:'space-between',
                    width:80,
                    marginRight:20,
                }}>
                    <TouchableOpacity>
                        <FontAwesome name="video-camera" size={24} color="white"/>
                    </TouchableOpacity>
                    <TouchableOpacity>
                        <Ionicons name="call" size={24} color="white"/>
                    </TouchableOpacity>
                </View>
            ),
        })
    }, [navigation])

    return (
        <SafeAreaView style={{flex:1, backgroundColor:'white' }}>
            <StatusBar style="light"/>
            <KeyboardAvoidingView
                behavior={Platform.OS ==='ios' ? "padding":"height"}
                style={styles.container}
                keyboardVerticalOffset={90}
            >
                <>
                    <ScrollView>

                    </ScrollView>
                    {/* Typing msg area */}
                    <View style={styles.footer}>
                        <TextInput
                            placeholder="send the message"
                            style={styles.textInput}
                            value={input}
                            onChangeText={(text)=>setInput(text)}
                        />
                        <TouchableOpacity onPress={sendMessage} activeOpacity={0.5}>
                            <Ionicons name="send" size={24} color='#2B68E6' />
                        </TouchableOpacity>
                    </View>
                </>
            </KeyboardAvoidingView>
        </SafeAreaView>
    )
}

export default ChatScreen

const styles = StyleSheet.create({
    container:{
        flex:1,
    },
    footer:{
        flexDirection:'row',
        alignItems:'center',
        width:'100%',
        padding:15,
    },
    textInput:{
        bottom:0,
        height:40,
        flex:1,
        marginRight:15,
        backgroundColor:'#ececec',
        padding:10,
        color:'grey',
        borderRadius:30,
    },
})
keyboard 밖에 터치하면 키보드 내려가게 만들기
TouchableWithoutFeedback으로 감싸기
import React, { useLayoutEffect, useState } from 'react'
import {
    StyleSheet, Text, Touchable, SafeAreaView,
    TouchableOpacity, View, KeyboardAvoidingView,
    Platform, ScrollView, TextInput, Keyboard, TouchableWithoutFeedback
} from 'react-native'
import { Avatar } from 'react-native-elements';
import { AntDesign, FontAwesome, Ionicons } from '@expo/vector-icons';
// import { SafeAreaView } from 'react-native-safe-area-context';
import { StatusBar } from 'expo-status-bar';


const ChatScreen = ({ navigation, route }) => {

    const [input, setInput] = useState('')


    useLayoutEffect(() => {
        navigation.setOptions({
            title: 'Chat',
            headerBackTitleVisible: false,
            headerTitleAlign: 'left',
            headerTitle: () => (
                <View style={{
                    flexDirection: 'row',
                    alignItems: 'center',
                }}>
                    <Avatar
                        rounded
                        source={{
                            uri: "http://www.connectingcouples.us/wp-content/uploads/2019/07/avatar-placeholder.png"
                        }}
                    />
                    <Text style={{
                        color: 'white',
                        marginLeft: 10,
                        fontWeight: '700',
                    }}>
                        {route.params.chatName}
                    </Text>
                </View>
            ),
            headerLeft: () => (
                <TouchableOpacity
                    style={{ marginLeft: 10 }}
                    onPress={navigation.goBack}
                >
                    <AntDesign name="arrowleft" size={24} color='white' />
                </TouchableOpacity>
            ),
            headerRight: () => (
                <View style={{
                    flexDirection: 'row',
                    justifyContent: 'space-between',
                    width: 80,
                    marginRight: 20,
                }}>
                    <TouchableOpacity>
                        <FontAwesome name="video-camera" size={24} color="white" />
                    </TouchableOpacity>
                    <TouchableOpacity>
                        <Ionicons name="call" size={24} color="white" />
                    </TouchableOpacity>
                </View>
            ),
        })
    }, [navigation])

    const sendMessage = () => {
        Keyboard.diss();
    }

    return (
        <SafeAreaView style={{ flex: 1, backgroundColor: 'white' }}>
            <StatusBar style="light" />
            <KeyboardAvoidingView
                behavior={Platform.OS === 'ios' ? "padding" : "height"}
                style={styles.container}
                keyboardVerticalOffset={90}
            >
                <TouchableWithoutFeedback onPress={Keyboard.dismiss}>
                    <>
                        <ScrollView>

                        </ScrollView>
                        {/* Typing msg area */}
                        <View style={styles.footer}>
                            <TextInput
                                placeholder="send the message"
                                style={styles.textInput}
                                value={input}
                                onChangeText={(text) => setInput(text)}
                            />
                            <TouchableOpacity onPress={sendMessage} activeOpacity={0.5}>
                                <Ionicons name="send" size={24} color='#2B68E6' />
                            </TouchableOpacity>
                        </View>
                    </>
                </TouchableWithoutFeedback>
            </KeyboardAvoidingView>
        </SafeAreaView>
    )
}

export default ChatScreen
메세지 보내기
chatScreen.js
    import React, { useLayoutEffect, useState } from 'react'
    import { StyleSheet, Text, Touchable, SafeAreaView,
        TouchableOpacity, View, KeyboardAvoidingView,
        Platform, ScrollView, TextInput, Keyboard, TouchableWithoutFeedback,
    } from 'react-native'
    import { Avatar } from 'react-native-elements';
    import { AntDesign, FontAwesome, Ionicons } from '@expo/vector-icons';
    // import { SafeAreaView } from 'react-native-safe-area-context';
    import { StatusBar } from 'expo-status-bar';
    import { db, auth } from '../firebase';
    import * as firebase from 'firebase'


    const ChatScreen = ({ navigation, route }) => {

        const [input, setInput] = useState('')

        useLayoutEffect(() => {
            navigation.setOptions({
                title: 'Chat',
                headerBackTitleVisible: false,
                headerTitleAlign: 'left',
                headerTitle: () => (
                    <View style={{
                        flexDirection: 'row',
                        alignItems: 'center',
                    }}>
                        <Avatar
                            rounded
                            source={{
                                uri: "http://www.connectingcouples.us/wp-content/uploads/2019/07/avatar-placeholder.png"
                            }}
                        />
                        <Text style={{
                            color: 'white',
                            marginLeft: 10,
                            fontWeight: '700',
                        }}>
                            {route.params.chatName}
                        </Text>
                    </View>
                ),
                headerLeft: () => (
                    <TouchableOpacity
                        style={{ marginLeft: 10 }}
                        onPress={navigation.goBack}
                    >
                        <AntDesign name="arrowleft" size={24} color='white' />
                    </TouchableOpacity>
                ),
                headerRight: () => (
                    <View style={{
                        flexDirection: 'row',
                        justifyContent: 'space-between',
                        width: 80,
                        marginRight: 20,
                    }}>
                        <TouchableOpacity>
                            <FontAwesome name="video-camera" size={24} color="white" />
                        </TouchableOpacity>
                        <TouchableOpacity>
                            <Ionicons name="call" size={24} color="white" />
                        </TouchableOpacity>
                    </View>
                ),
            })
        }, [navigation])

        const sendMessage = () => {
            Keyboard.dismiss();

            db.collection('chats').doc(route.params.id).collection('messages').add({
                timestamp:firebase.firestore.FieldValue.serverTimestamp(),
                message:input,
                displayName:auth.currentUser.displayName,
                email:auth.currentUser.email,
                photoURL:auth.currentUser.photoURL,
            })

            setInput('')
        }

        return (
            <SafeAreaView style={{ flex: 1, backgroundColor: 'white' }}>
                <StatusBar style="light" />
                <KeyboardAvoidingView
                    behavior={Platform.OS === 'ios' ? "padding" : "height"}
                    style={styles.container}
                    keyboardVerticalOffset={90}
                >
                    <TouchableWithoutFeedback onPress={Keyboard.dismiss}>
                        <>
                            <ScrollView>

                            </ScrollView>
                            {/* Typing msg area */}
                            <View style={styles.footer}>
                                <TextInput
                                    placeholder="send the message"
                                    style={styles.textInput}
                                    value={input}
                                    onChangeText={(text) => setInput(text)}
                                    onSubmitEditing={sendMessage}
                                />
                                <TouchableOpacity onPress={sendMessage} activeOpacity={0.5}>
                                    <Ionicons name="send" size={24} color='#2B68E6' />
                                </TouchableOpacity>
                            </View>
                        </>
                    </TouchableWithoutFeedback>
                </KeyboardAvoidingView>
            </SafeAreaView>
        )
    }

    export default ChatScreen

    const styles = StyleSheet.create({
        container: {
            flex: 1,
        },
        footer: {
            flexDirection: 'row',
            alignItems: 'center',
            width: '100%',
            padding: 15,
        },
        textInput: {
            bottom: 0,
            height: 40,
            flex: 1,
            marginRight: 15,
            backgroundColor: '#ececec',
            padding: 10,
            color: 'grey',
            borderRadius: 30,
        },
    })
firebase 가보면
messages 생김
set up listener
ChatScreen
import React, { useLayoutEffect, useState } from 'react'
import {
    StyleSheet, Text, Touchable, SafeAreaView,
    TouchableOpacity, View, KeyboardAvoidingView,
    Platform, ScrollView, TextInput, Keyboard, TouchableWithoutFeedback,
} from 'react-native'
import { Avatar } from 'react-native-elements';
import { AntDesign, FontAwesome, Ionicons } from '@expo/vector-icons';
// import { SafeAreaView } from 'react-native-safe-area-context';
import { StatusBar } from 'expo-status-bar';
import { db, auth } from '../firebase';
import * as firebase from 'firebase'


const ChatScreen = ({ navigation, route }) => {

    const [input, setInput] = useState('')
    const [messages, setMessages] = useState([])

    useLayoutEffect(() => {
        navigation.setOptions({
            title: 'Chat',
            headerBackTitleVisible: false,
            headerTitleAlign: 'left',
            headerTitle: () => (
                <View style={{
                    flexDirection: 'row',
                    alignItems: 'center',
                }}>
                    <Avatar
                        rounded
                        source={{
                            uri: messages[0]?.data.photoURL
                        }}
                    />
                    <Text style={{
                        color: 'white',
                        marginLeft: 10,
                        fontWeight: '700',
                    }}>
                        {route.params.chatName}
                    </Text>
                </View>
            ),
            headerLeft: () => (
                <TouchableOpacity
                    style={{ marginLeft: 10 }}
                    onPress={navigation.goBack}
                >
                    <AntDesign name="arrowleft" size={24} color='white' />
                </TouchableOpacity>
            ),
            headerRight: () => (
                <View style={{
                    flexDirection: 'row',
                    justifyContent: 'space-between',
                    width: 80,
                    marginRight: 20,
                }}>
                    <TouchableOpacity>
                        <FontAwesome name="video-camera" size={24} color="white" />
                    </TouchableOpacity>
                    <TouchableOpacity>
                        <Ionicons name="call" size={24} color="white" />
                    </TouchableOpacity>
                </View>
            ),
        })
    }, [navigation, messages])

    const sendMessage = () => {
        Keyboard.dismiss();

        db.collection('chats').doc(route.params.id).collection('messages').add({
            timestamp: firebase.firestore.FieldValue.serverTimestamp(),
            message: input,
            displayName: auth.currentUser.displayName,
            email: auth.currentUser.email,
            photoURL: auth.currentUser.photoURL,
        })

        setInput('')
    }

    useLayoutEffect(() => {
        const unsubscribe =
            db
                .collection('chats')
                .doc(route.params.id)
                .collection('messages')
                .orderBy('timestamp', 'desc')
                .onSnapshot((snapshot) => setMessages(
                    snapshot.docs.map(doc => ({
                        id: doc.id,
                        data: doc.data(),
                    }))
                ))
        return unsubscribe
    }, [route])

    return (
        <SafeAreaView style={{ flex: 1, backgroundColor: 'white' }}>
            <StatusBar style="light" />
            <KeyboardAvoidingView
                behavior={Platform.OS === 'ios' ? "padding" : "height"}
                style={styles.container}
                keyboardVerticalOffset={90}
            >
                <TouchableWithoutFeedback onPress={Keyboard.dismiss}>
                    <>
                        <ScrollView contentContainerStyle={{paddingTop:15}}>
                            {messages.map(({ id, data }) => (
                                data.email === auth.currentUser.email ? (
                                    <View key={id} style={styles.reciever}>
                                        <Avatar
                                            rounded
                                            position="absolute"
                                            //web
                                            containerStyle={{
                                                bottom: -15,
                                                right: -5,
                                                size: 30
                                            }}
                                            bottom={-15}
                                            right={-5}
                                            size={30}
                                            source={{
                                                uri: data.photoURL,
                                            }}
                                        />
                                        <Text style={styles.recieverText}>{data.message}</Text>
                                    </View>
                                ) : (
                                    <View style={styles.sender}>
                                        <Avatar
                                            rounded
                                            position="absolute"
                                            //web
                                            containerStyle={{
                                                bottom: -15,
                                                left: -5,
                                                size: 30
                                            }}
                                            bottom={-15}
                                            left={-5}
                                            size={30}
                                            source={{
                                                uri: data.photoURL,
                                            }}
                                        />
                                        <Text style={styles.senderText}>{data.message}</Text>
                                        <Text style={styles.senderName}>{data.displayName}</Text>
                                    </View>
                                )
                            ))}
                        </ScrollView>
                        {/* Typing msg area */}
                        <View style={styles.footer}>
                            <TextInput
                                placeholder="send the message"
                                style={styles.textInput}
                                value={input}
                                onChangeText={(text) => setInput(text)}
                                onSubmitEditing={sendMessage}
                            />
                            <TouchableOpacity onPress={sendMessage} activeOpacity={0.5}>
                                <Ionicons name="send" size={24} color='#2B68E6' />
                            </TouchableOpacity>
                        </View>
                    </>
                </TouchableWithoutFeedback>
            </KeyboardAvoidingView>
        </SafeAreaView>
    )
}

export default ChatScreen

const styles = StyleSheet.create({
    container: {
        flex: 1,
    },
    footer: {
        flexDirection: 'row',
        alignItems: 'center',
        width: '100%',
        padding: 15,
    },
    textInput: {
        bottom: 0,
        height: 40,
        flex: 1,
        marginRight: 15,
        backgroundColor: '#ececec',
        padding: 10,
        color: 'grey',
        borderRadius: 30,
    },
    recieverText: {

    },
    senderText: {
        color:'white',
        fontWeight:'500',
        marginLeft:10,
        marginBottom:15,
    },
    reciever: {
        padding: 15,
        backgroundColor: '#ececec',
        alignSelf: 'flex-end',
        borderRadius: 20,
        marginRight: 15,
        marginBottom: 20,
        maxWidth: '80%',
        position: 'relative',
    },
    sender: {
        padding: 15,
        backgroundColor: '#ececec',
        alignSelf: 'flex-start',
        borderRadius: 20,
        marginRight: 15,
        marginBottom: 20,
        maxWidth: '80%',
        position: 'relative',
    },
    senderName:{
        left:10,
        paddingRight:10,
        fontSize:10,
        color:'white',
    }
})
CustomListItems
import React,{useState, useEffect} from 'react'
import { StyleSheet, Text, View } from 'react-native'
import { ListItem, Avatar } from 'react-native-elements'
import {db} from '../firebase'

const CustomListItem = ({id,chatName,enterChat}) => {
    const [chatMessages, setChatMessages] = useState([])

    useEffect(()=>{
        const unsubscribe = db
        .collection('chats')
        .doc(id)
        .collection('messages')
        .orderBy('timestamp','desc')
        .onSnapshot((snapshot)=>
            setChatMessages(snapshot.docs.map((doc)=>doc.data()))
        )
        return unsubscribe
    })

    return (
        <ListItem
            key={id}
            bottomDivider
            onPress={()=>enterChat(id,chatName)}
        >
            <Avatar
               rounded
               source={{
                   uri: chatMessages?.[0]?.photoURL ||
                   "http://www.connectingcouples.us/wp-content/uploads/2019/07/avatar-placeholder.png"
               }}
            />
            <ListItem.Content>
                <ListItem.Title style={{fontWeight:'800'}}>
                    {chatName}
                </ListItem.Title>
                <ListItem.Subtitle numberOfLines={1} ellipsizeMode="tail">
                    {chatMessages?.[0]?.displayName}:{chatMessages?.[0]?.message}
                </ListItem.Subtitle>
            </ListItem.Content>
        </ListItem>
    )
}

export default CustomListItem

const styles = StyleSheet.create({})
채팅방 이름 적지 않았을 때 버튼disabled 만들기
AddChatScreen
    return (
        <View style={styles.container}>
            <Input
                placeholder="Enter a chat name"
                value={input}
                onChangeText={(text)=>setInput(text)}
                //onSubmitEditing={createChat}
                leftIcon={
                    <Icon name="wechat" type="antdesign" size={24} color="orange"/>
                }
            />
            <Button disabled={!input} onPress={createChat} title='Create new Chat' />
        </View>
    )
diploy to the web
Reference:https://reactnavigation.org/docs/getting-started
https://reactnavigation.org/docs/getting-started/
reactnavigation.org
https://www.youtube.com/watch?v=nQVCkqvU1uE
'React + React Native + Expo' 카테고리의 다른 글
| [React Native] 이중 Navigation Container / Keyboard tabBar Options (0) | 2021.08.05 |
|---|---|
| [React Native] Bottom tab에 아이콘 추가하기 expo/vector-icons (0) | 2021.08.04 |
| [React] 리액트 CRUD (0) | 2021.07.31 |
| [React native] 기초 다지기 - view / 버튼 / Image / flex 세로 가로 설정 / 정렬 등 CSS (0) | 2021.07.30 |
| [React 연습 5일차] 리액트 TicTacToe Game 구현 with Hooks API (0) | 2021.07.14 |


